Your Quest Bar orders help create more giveaways. Order today!

NEW! Working Search Button! USE IT!!!

Love BF as a blog? You'll love it even more as an e-mail newsletter. Get recipes, tips and more!

Red, White and Blue Protein Popsicles (Featuring Premier Protein)

This post is sponsored by Premier Protein
It is my theory that the 4th of July is a blueberry's favorite holiday. Why? Because on that day the red/white/blue color combo is just everything -- and, really, what other food can you use to play that up?

I personally love blueberries, not only for their antioxidant qualities, but because they are a nice, mild berry. I like popping a few straight out of the fridge, adding to my cottage cheese and a multitude of other options.

That's why when the good folks at Premier Protein sent me the recipe for this Patriotic Protein Pop (see what I did there?) I couldn't wait to share it with you. It's so easy! Especially if you've invested in popsicle molds to make my Orange Creamsicle Protein Pops. Now you have not one, but TWO, three ingredient recipes to make in them!

Red, White and Blue Protein Popsicles

Ingredients:
  • Sliced Strawberries
  • Blueberries
  • 1-2 Premier Protein® Vanilla Shake
Directions:

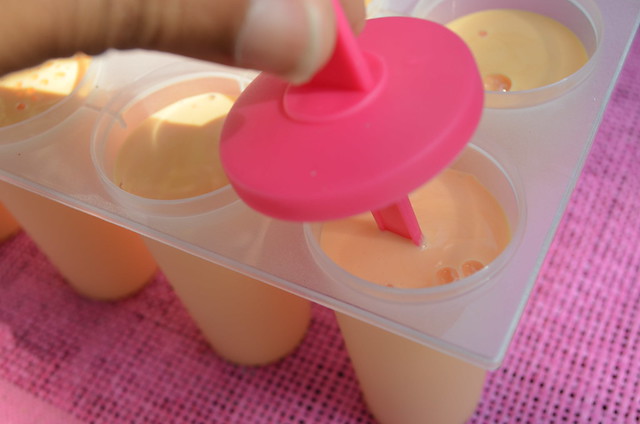
Line popsicle molds with sliced strawberries and blueberries.

Fill popsicle molds with Premier Protein® Vanilla Shake.

Freeze overnight.

Enjoy!

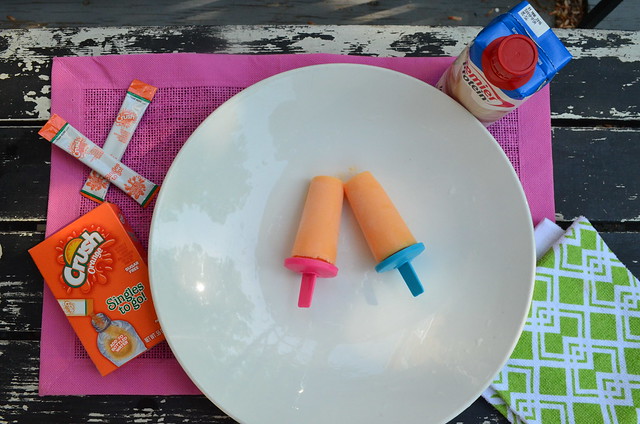
Protein Orange Creamsicles (featuring Premier Protein)

Protein Orange Creamsicles (featuring Premier Protein)

They call this weekend the "unofficial" start of summer.

Damn that. I'm calling it. It's summer!

I mean after the winter we had? We deserve it. (Unless of course you don't like summer in which case...sorry...I love it so forgive my obnoxiousness over the next few months.)

Raise your hand if the highlight of your summer day as a kid was hearing the jingle of the ice cream truck? (Raises hand) Oh what a joyous sound that was! The first faint sounds were my signal to beg my mother (in the most annoying voice possible) for a few coins so that I could partake in my all-time favorite summer treat: Orange Creamsicles.

Today, I still eat Orange Creamsicles but - sorry, ice cream man! - I make them myself. Using the basic frozen treat instructions from my book, The Bariatric Foodie Guide to Perfect Protein Shakes, here's how I make this delicious summer treat!

Nik's Orange Creamsicle Protein Pops

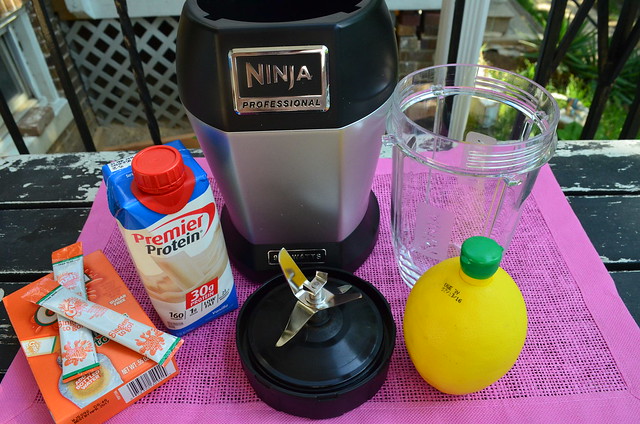
Ingredients:
Directions:

Protein Orange Creamsicles (featuring Premier Protein)
So let's not talk about how I got this Nutri-Ninja like a year ago and I am just starting to use it regularly. 
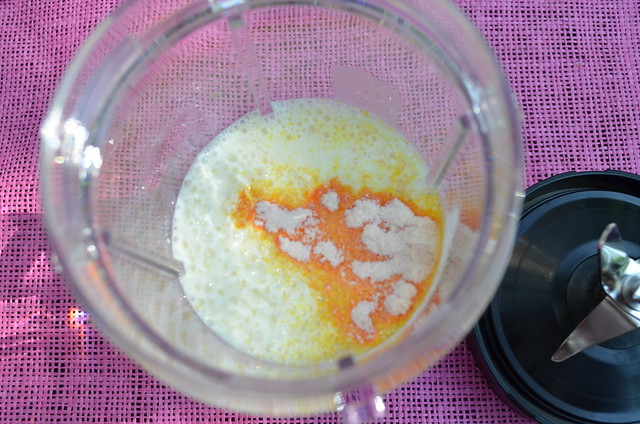
Combine everything in a blender for two minutes, then pour into popsicle molds.

Protein Orange Creamsicles (featuring Premier Protein)


Protein Orange Creamsicles (featuring Premier Protein)

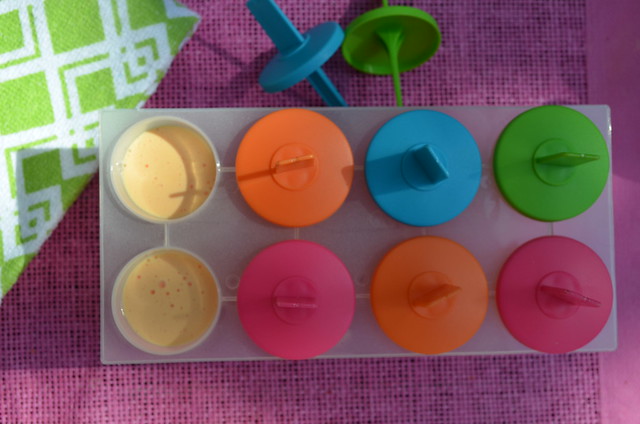
NOTE: The ones I used, I got at Family Dollar...for a dollar! For these I had to add about three additional tablespoons of milk (I use almond) to fill all 8 slots.

Protein Orange Creamsicles (featuring Premier Protein)

Freeze well. To remove, run frozen pop mold under cool (not cold, not hot, not warm but cool) water for a few seconds and try to coax it out. Repeat until pops dislodge from the mold.

TIP: For an extra protein boost you can add more protein powder before blending the first time (I'd recommend no more than one additional serving of protein powder that has at least 25g protein in it). Stick with vanilla. And DO use the lemon juice. Lemon juice brings out the fruitiness of fruit flavors. The pop will taste a bit flat without it. 

Outtake pics!

Protein Orange Creamsicles (featuring Premier Protein)
My attempt at creating a summer scene. I will concede there may have been a bit too much going on here.
Protein Orange Creamsicles (featuring Premier Protein)
I handle my popsicles with the utmost care.
Untitled
Yeah...being a food blogger is a tough job some days. But somebody's gotta do it!


And remember this recipe is just one of dozens included in The Bariatric Foodie Guide to Perfect Protein Shakes. The book not only gives you great shake ideas, but instructions on how to make your shakes into crave-worthy treats like this. Check it out on Amazon

Foodie Review: Enlighten Fudge Bar

FCC Disclousre: The reviewer of this product was given free product for the purposes of this review, however was not monetarily compensated. The opinions expressed in this review are those solely of the individual reviewer and may not express the opinions of Bariatric Foodie.
 
Enlighten Ice Cream. The good for you ice cream. We'll just see about that won't we???
 
Admittedly this review is hella late (as is my custom at times). My apologies. But since there are a few more weeks of warm weather yet, I'm hoping this review will help you satisfy your end-of-summer ice cream cravings.
 
At first glance, I admit Enlightened has potential. Per their website, the bars come in FIVE different flavors: Fudge, Coffee, Orange Cream, Toasted Almond and Peanut Butter. Here are the stats on the fudge bar, which is what is being reviewed here. This is per the Enlightened website.
  • 70 calories
  • 2g fat
  • 14 total grams carbohydrates
  • 5g fiber (bringing the net carbs down to 9g)
  • 3g sugar
  • 6g erythritol (a sugar alcohol BUT one that tends to have very little impact on the human digestive system)
  • 8g protein
So let me pause and say this. From the numbers alone this appears to be a pretty decent bar. Which is exactly what makes me suspicious! That's why I asked my Foodie-pal Cindy to review check these bars out for you. Her mission: to find out if an ice cream bar could be both good and good FOR you.
 
I asked Cindy to review the product based on the following criteria: packaging, aesthetics (smell, look of the product), taste, nutritional value and to give an overall verdict. Here's what she had to say. 
 
Q: What did you think of the packaging? Was it informative? What could you tell simply by looking at the package?


Cindy: The small "e" with a halo above it makes it look like an Angelic item…..blue sky and clouds. Very nice. There was lots of information to catch your eye on the front of box. Information WILL catch a Bari patient’s eye. Just from looking at the package I learned it has 8 grams of protein and only 70 calories. It has only 4 bars in one box. And it looked tasty.
 
Q: What did you think about the product's aesthetics? How did it look, smell?
 
Cindy: If anything I'd say the product had a frozen smell, not mediciny or foody, just icy. When I first bit into the bar it was a bit hard, so it does freeze well. Then after a few bites - as it thawed a  - the bar became softer softer.
 
Q: How did the Enlightened bar taste?
 
Cindy: I ate a few bars over the course of a week before answering this question to be sure of my opinion. These bars are yummy, thick, creamy and fulfilling. Not as creamy as a Dove bar but thick and creamy almost like that. Some fudge bars taste like ice milk, this has a creamy ice cream taste to it. I do have to say I have to bite the first couple bites as I mentioned earlier, but after a couple creamy licks, the flavoring of the fudge was also spot on.
 
Q: What did you think of the nutrition?
 
Cindy: This would be considered a high protein product, since there are 8 grams of protein and only 70 calories. This product does have 14 grams of carbohydrates though. The dietary fibers are 5 grams so subtract that from the carbs and you get 9 grams. It does say on the label that it has only 3 net carbs. Product contains Erythritol.
 
Q: What do you think of the overall value of this product? Is it something you'd buy?
 
The price on the bars is reasonable (Nik Note: At the time of this writing, the bars were on sale at my local grocery store for about $3.50/box of 4). I did very much enjoy this product. And glad to see they have a variety of flavors. My next couple to buy are: the Toasted Almond and the Ice Cream sandwich. I would like to see them have more than 4 items in one box.
 
Q: So what's your final verdict? Should Foodies purchase or pass?
 
Cindy: Purchase!
 
There are a few other notes I learned from reading their website's FAQs:
  • ENLIGHTENED Ice Cream is certified kosher by the Orthodox Union (OU).
  • It contains all-natural ingredients (yes, erythritol is a nutural ingredient)
  • Besides erythritol, the bars use monkfruit as a sweetener
  • The milk used in the bars is hormone-free
Enlightened was kind enough to give me another coupon to try out the bars and I'd love a review of one of the remaining flavors. Wanna be my reviewer?
 
Leave a comment about which flavor (besides fudge) you'd like to try (along with your email address) and you'll be entered to win! You have until Sunday at noon to put your name in the hat. I'll announce the winner Monday morning.
 
Good luck, everyone and thanks Cindy!


S'mores Protein Pudding Pie

S'mores Protein Pie featuring CLICK 
Even though we've been experiencing fall-like weather in Baltimore over the past week it is still, in fact, summer. Which means my gut instinct is to NOT turn on the oven if I can avoid it. I have one big cooking day a week where I make or "start" a bunch of things and then finish them off throughout the week (Dear Rachel: I had the idea first!)

So once the Cheesy Chicken & Broccoli Bake and a batch of my Curried Chicken were all squared away, it was time to think about dessert. Now dessert is mainly a notion for my family. Even at six years post-op, anything more than a bite of something sweet directly after a meal is not happening.

For me, like so many other post-ops, dessert is another meal entirely. That's part of what makes it problematic for me. I love protein shakes and I've made all manner of desserts (especially cheesecakes!) weight loss surgery friendly, but here's a true fact: Nik cannot stand too much sweet stuff! Nope, I can't. A few bites and I'm good to go. This makes it imperative that I make things my children (and now, my boyfriend) also like. Because there's no way in hell I'm finishing a dessert by myself, short of being able to freeze it.

ANYWHO.  Protein Pudding is often a favorite dessert of mine but I decided I'd like a protein pudding pie. Since the children are still gone for the summer, I rightfully should have made these in ramekins but...I didn't. What can I say? I don't always have a good explanation for why I do the things that I do!

Nik's S'mores Protein Pudding Pie
(This yields a family-sized or share-able pie. If you'd like smaller portions, this also makes about 8 ramekins worth of pie, which can be frozen for up to two months, if wrapped properly.)

Ingredients:
  • 2 (1 oz.) boxes sugar-free chocolate pudding mix
  • 3 scoops (doesn't matter the size of the scoop) unflavored protein powder (NOTE: I highly suggest an unflavored protein powder, like BiPro USA, but you can use either a vanilla or chocolate based protein powder. But your pie will be SWEEEEEEEET.)
  • 1 tbsp. unsweetened cocoa powder
  • 2 -1/4 c. milk (NOTE:  must be cow's milk. Traditional pudding mix won't set up with almond or soy milk)
  • 1/4 c. Torani Sugar-free S'mores flavored syrup
  • 1 tub (8 oz.) whipped topping (low-fat, fat-free, your choice)
  • 1 crumb pie crust (you can either do a Fiber One/high protein or fiber cereal crust OR you can do what I did and splurge on a pre-made graham cracker crust...it truly was a lazy evening!)
Directions:

In a bowl, whisk together pudding mix, protein powder and cocoa powder until thoroughly combined.

Add milk and syrup and blend whatever way you see fit (that particular evening I didn't feel like breaking out the mixer so I just whisked by hand). The mixture will be thick and it may appear slightly gritty. If so, add a bit more milk (try adding 2 tbsp. at a time) until it gets better. In my experience, protein pudding is always at least slightly gritty. And did I mention the mixture would be THICK?

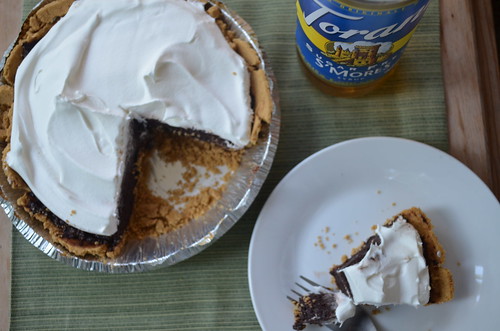
Spread the mixture in your pie crust evenly. It should only come about 3/4 of the way up the crust. Then top with whipped topping. Cover it (that's where the premade crust comes in handy as it has a plastic dome top) and refrigerate an hour before serving.

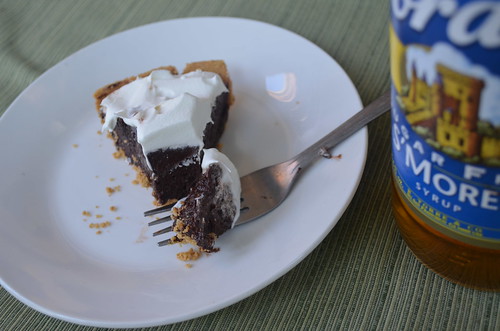
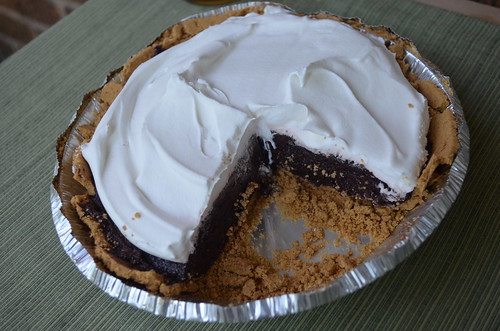
As is quickly becoming my new custom, here are a few more shots I took of the pie, for your viewing pleasure!

S'mores Protein Pie featuring CLICK
Just a little slice is all you need!


S'mores Protein Pie featuring CLICK
So I had a mishap with the crust. It sort of broke up on me. Doesn't affect the taste one bit!


For more yummy, protein-packed ideas, check out The Bariatric Foodie Guide to Perfect Protein Shakes, available in hardcopy and Kindle eBook on Amazon, as well as on Smashwords for iPad and Nook. The book not only gives you ideas for great shakes, but teaches you how to make other protein treats like protein ice cream and protein pudding (which is the base of this pie!). 


One Recipe, Three Ways! Protein Quick Bread.


Recap: In honor of the release of The Bariatric Foodie Breakfast Book we’re talking about breakfast this week!

The next major section of the book is called “Smart Carbs.” Many folks are afraid of carbs, in general. With all the publicity about them, it’s no wonder. So before you get this book and freak out, I suggest you read my primer, “Carb Confusion” to brush up on what carbs really are (I find many people really do have the wrong idea) and why they are actually a good part of an overall healthy eating plan.

Now that we’re all on the same page, I should say in the book I mainly tackle one type of carb: starches. Yes, starches can be made in ways that are weight-loss surgery friendly and beneficial to your body and overall health. You just have to be smart about it, hence the chapter name.

In my estimation the easiest type of starch to make weight-loss surgery friendly are quick breads. For those who don’t speak “food-ese” a quick-bread, generally speaking, is just what it sounds like, a bread that can be made quickly by nixing the yeast (and the multiple rises/wait times it requires) and using more “cakey” ingredients. Examples of quick breads include banana and pumpkin bread, both of which already have recipes here on the blog (click the links on the words to get to them).

This quick bread started out with my over-abundance of roasted pear butter. I made a lot of that stuff and didn’t want to waste any of it. The divas liked it (my oldest daughter, who hates pears, loved it…score!). One thing I know about pear/apple butter is that it can be used to replace some of the oil/butter in baking to yield a moist result. That information in hand, I set out with a very specific goal: to make a protein quick bread recipe that contains no protein powder.

My other recipes do but variety is good, right?

In the book, I share the recipe to a very easy, make-ahead baking mix you can make and store to streamline this process even further!

As promised I’m giving you the recipe but also THREE ways you can prepare it.

Pear Spice Protein Quick Bread

Ingredients:

Wet Ingredients:
  • 1.5 c. pear butter/sauce (or natural apple sauce)
  • ½ c. no-calorie sweetener (if you are using natural apple sauce, also add ½ tsp. apple pie spice)
  • 1 tsp. vanilla
  • 2 large eggs (or equivalent amount of liquid egg substitute)
  • Up to 2/3 c. milk (I used unsweetened almond milk) 
Dry Ingredients:
  • 1 c. oat flour (don’t freak out, I’m going to tell you how to make this!)
  • 1 c. soy flour (if you don’t like soy flour use another type of non-white flour replacement such as almond meal or garbanzo bean flour)
  • ½ c. flax meal (NOT flax seed)
  • ¼ tsp. salt
  • 1 tsp. baking powder
Directions:

How to make oat flour: Place 1 c. quick cooking oats (I don’t recommend traditional oats for this) in a food processor (I used my Magic Bullet knock-off) and whiz until it has been completely pulverized into flour.

Preheat your oven to 350 degrees.

Mix together pear or apple sauce, spices and vanilla in a large bowl. Add eggs, one at a time, and mix thoroughly. Set aside.

In a separate bowl mix together all the dry ingredients and whisk to thoroughly combine them.


Mix the dry ingredients into the wet stirring. The result will be thick. Add enough milk to loosen the batter to the consistency of a thick bowl of oatmeal (Note: no matter what don’t use more than 2/3 c. milk but feel free to use less if it doesn’t take that much).

Give the batter a taste. It should taste like really good (although maybe a tad too sweet) apple/cinnamon oatmeal. If not, adjust spices accordingly! Don’t worry that it tastes too sweet in the batter form. The oven will do its magic and it will all even out.

Now…here’s where you can get creative.

Make loaves: This works well as either a traditional loaf or in mini-loaf pans. The mini-loaf pans are great for making things ahead so that you can wrap and freeze. These loaves freeze well when properly wrapped. To eat, you’d simply set the loaf out in room temperature and allow it to thaw. You can nuke it if you want warm bread. What you see at the top of this post are two “short loaves” (meaning I divided the batter between two loaf pans so that it wouldn’t be so tall). For me, the short loaves are easier to handle AND gave me the opportunity to test out idea #3 below.

Directions: If doing a full loaf, spray your loaf pan with nonstick cooking spray made for baking (they sell it at the grocery store). Fill the pan with batter (it will almost completely fill the loaf pan). For short loaves, use two pans. For mini loaves, spray the mini-loaf slots and divide the mixture evenly. This makes about 6-8 loaves, depending on how much batter you use.

Bake time for full/short loaves: 25-30 minutes
Bake time for mini-loaves: 20-25 minutes

Make mini-muffins: This makes about 24 mini-muffins, give or take a few. These too freeze well and are great for grab & go. Just make sure you’re using a good non-stick mini-muffin tin!

Directions: Distribute batter evenly into mini-muffin tin slots. Bake for 15-20 minutes or until a toothpick inserted comes out clean.

Make (protein) biscotti! Well…sorta. Technically biscotti is a twice baked cookie but my loaf turned out so wonderfully moist I just knew I could pull it off so I tried and it worked! To make it into biscotti, make a “short loaves” (simply meaning divide the batter between two loaf pans). Allow them to cool after coming out of the oven then slice them into sections about a half inch thick. Spray down a cookie sheet with nonstick cooking spray and bake them for an additional 7-10 minutes on each side. Both sides should brown. Your result will be firm but not quite as rock hard as a traditional biscotti.


Nik's Roasted Pear Butter

See the "HOW TO USE" section for details on what this is!

Ok, so I’m really, really, really REALLY behind on stuff lately. For those who have followed this blog more than a year, this is a familiar song and dance.

But I’m trying to get caught up because next week will be all about the release of The Bariatric Foodie Breakfast Book! I’m so excited about that (and nervous).

But first we have some unfinished business to attend to. I owe you TWO recipes that I demonstrated on social media. I’ll post one today, the other tomorrow. First up, let’s talk pears!

Have you ever had fruit in your refrigerator too long? It goes through some stuff! It deepens in color, softens in texture and, in some cases, begins to bruise to the touch. And there’s a point where you look at it, remembering that you really did buy it for a purpose (you really did!) but the fruit has gone past its ability to fulfill that purpose and it is all. Your. Fault.

Ok, so maybe that’s a bit dramatic, but my main point here is that over-ripe fruit can still have a place in your food plan! But first a few words:
  • Over-ripe and rotten are NOT the same thing. You should be able to tell the difference just by looking at the fruit but if there is any doubt, cut a piece of fruit in half. If it is mostly still healthy inside with only a few soft/bruised spots, cut those out and keep it moving.
  • However, note that over-ripe fruit is fruit whose sugars have developed and intensified. That means it’s naturally sweeter than the day it was picked and therefore when you prepare stuff with it, you’ll need to adjust additions accordingly.
  • My ultimate rule for over-ripe fruit goes like a page from the Johnnie Cochran playbook: “If in doubt, throw it out!”
So anyway. One day I was in the grocery store and noticed in the produce section that they had the “last chance” bin out. That’s where the produce folks package up fruits/veggies that are older and sell them for deep, deep discounts. It is a well-known fact in my household that I have the physical inability to resist this cart. I can. Not. Do it!

On the cart this day was a pack of 6 pears. Very, very ripe pears. I bought them, endeavored to do something yummy with them, then put them in the fridge.

And then…four days later…they were very, very VERY ripe pears. When I have very, very, very ripe pears, I start thinking pear butter!

This probably isn’t true pear butter to pear butter officianados (I wonder what they are called) but it was easy and can be used a bunch of different ways.

Nik’s Roasted Pear Butter

Ingredients:
  • 4-6 whole pears (Nearly any kind works, but the ones in the picture are Bosk. Also note they don’t have to be over-ripe. They can be freshly bought.)
  • 2 tsp. lemon juice
  • Optional: ½ c. no-calorie sweetener (I used Splenda) or to taste, 1 tsp. cinnamon or 1 tsp. apple pie spice and I’ll say below how you can add protein, if you wish.

Directions:

Preheat your oven to 350 degrees.

Cut pears in half. (If they are over-ripe, this will be a “juicy” process. You don’t have to peel or seed them at this point.)

Spray a cookie sheet down with nonstick cooking spray. Place pears, cut side down, on the cookie sheet. 

Roast your pears for 15-25 minutes (the more ripe they are, the less time they’ll take to roast). When they come out of the oven they should be easily pierced with a fork, the skin should have darkened considerably (mine already had dark skins because they were over-ripe, but look for an olive color).


Allow the pears to cool thoroughly before easily removing the skin with a spoon or paring knife. Flip them over and then use a teaspoon to easily remove the seeds.

Place your roasted pears in a bowl (or the bowl of a food processor if that’s what you’ll use to pulverize them) and add lemon juice, sweetener (if using) and spice. If you are using protein powder, you’d add that at this stage as well. I recommend using ¼ c. (or four tablespoons) of protein powder for every four pears you use, but play around with it. You can use vanilla, unflavored or any other kind you like!

If using a food processor, pulverize your pears until they reach your desired consistency (they can be chunky, they can be smooth…go with what you like best!). I don’t have a food processor so I used an immersion blender and did the same.

Chill until ready to use.

HOW TO USE

Well for me I like this straight out of the bowl but I did add some to some protein oatmeal and the kids have been noshing on it as well. I also put some aside and added some black chia seeds, stuck it in fridge (so that the seeds could fill up with water. Post-ops should NOT consume un-hydrated chia seeds as they take in fluid and expand in the gut in their un-hydrated form). What I ended up with is this:


It’s interesting. It tastes good, has a little bit of a crunch, it thickened the whole deal and it gave it an almost…dare I say…carbonated mouthfeel. So…if you’re interested give that a try. 

I also used it to make the dessert at the top of the post which I called "deconstructed pear crumble." It's basically 1/3 c. of the pear butter, about 1/4 c. of Bear Naked protein granola (I also used Fiber One another time but did not photo that) and a little poof of whipped cream. Yummy!

BF Review (and Recipe): Quest Cookies & Cream Protein Bar and Shannon's Quest Canoli


While we were all embroiled in The Bariatric Foodie Pledge, Quest went and released a new bar – Cookies and Cream! I did a quick and dirty review of it on social media, but I also asked my pal Shannon (of TacoCasserole picture fame) to give the bars a try. And I gave her a challenge. The Quest blog challenges Quest lovers to come up with creative ways to use the bars, so that’s the challenge I put to Shannon. So she played with her food to make a Quest cannoli! The recipe follows the review.
Enjoy and thanks to Shannon for the review!

Shannon’s Quest Bar Review
*The products used for this review were given by Quest Nutrition, however, neither the reviewer nor Bariatric Foodie was paid to perform this product review.

Product: Quest Cookies & Cream protein Bar

Stats: 180 calories, 7g fat, 22g carbs, 17g fiber, 1g sugar, 2g erythritol, 21g protein.

Cost: Varies, on Quest website it is $2.39 for a single bar, $24.99 (or $2.08/bar) for a box of 12.

*If you purchase Quest Bars using the ad on the right menu bar, Bariatric Foodie receives a small commission. 

Packaging:

The wrapper itself was very pleasing to me, the picture was crisp and I think the large cookie photographed on the package really makes it known what flavor you are getting.  Another thing about the packaging I like is that I can quickly see the amount of sugar and protein in the product. Just from a general standpoint, this makes things so much easier for me when I am looking to purchase a product, having that info right on the front, and somewhat highlighted makes my life easier.

Nutrition:

This product provides 21g of protein in one serving, and is 180 calories. I like that it packs such a punch because, if I am going to eat a protein bar as my meal (I very rarely do), I want to be able to get as much out of it as possible. Quest bars are regularly reviewed on Bariatric foodie, and I believe this bar is about on par with the others in their product line. As an aside, erythritol, the type of sugar alcohol used in this bar has very little effect on our bodies, unlike some others.

Aesthetics:

Upon opening the packaging I smelled the protein bar, and as with most of them I got a very, almost overly sweet smell, not really distinguished as to cookies and cream but definitely sweet.

The bar I had left over after playing with my food and making a cannoli had some very large chunks of cookie in it, which I very much enjoyed while eating the protein bar in the traditional way. It broke up the texture of the bar nicely. The bar itself was quite soft and easy to eat.

It did remind me a bit of cookies and cream, though not exactly and I don’t think my taste buds will ever be fully confused when it comes to a protein bar, the protein flavor is always there.  More than a cookies and cream flavor it reminded me of cookie dough. Never having tried their actual cookie dough flavor, I will say I think this would be an awesome addition chunked up into some protein ice cream. I also thoroughly enjoyed this as a cannoli, it really had a crunch and flavor that paired well with the cannoli filling.

I have generally been very impressed with Quest bars, and this one did not disappoint. As an emergency meal, or a snack, or even cooked into a yummy dessert they are, in my opinion, a decent choice.  In my area Quest bars are not so readily available, and the ones I have purchased locally have usually been very hard, nothing like this one. Because of this I limit myself to purchasing online only, and don’t often get the opportunity to do so, as my budget doesn’t always allow for it. That being said, if I were able to purchase Quest bars in the future this would be one on my list to buy.


Shannon’s Quest Cannoli

Ingredients:
  • 1 Quest Cookies & Cream protein bar
  • 4 oz. ricotta cheese (part-skim or regular, your choice)
  • 2 tbsp. unsweetened cocoa powder
  • 1.5 tbsp. no-calorie sweetener
  • Macadamia or pistachio nuts, whipped cream, and Strawberry as garnish if desired

For this recipe you will also need: A cannoli-form or a ¼-inch metal dowel, a large, sturdy glass (sprayed with nonstick cooking spray) and some parchment paper

Directions:
  1. Preheat oven to 400° F
  2. Unwrap Quest bar and place between two pieces of sprayed wax paper. Put in microwave for about 8 seconds, test pliability with finger and put back in if you cannot easily smoosh the bar, this will make it easier to roll flat with a rolling pin.
  3. Using your sprayed glass as a rolling pin, roll the bar down into a slight circular shape in between the wax paper and allow to cool slightly before peeling off one layer of wax paper.
  4. Using a cannoli form, roll quest bar on the form and place on a parchment paper lined baking sheet.
  5. Place in preheated oven for 5-7 minutes until golden.
  6. In a small bowl place ricotta, cocoa powder, and Splenda mix thoroughly until combined.  Transfer to a piping bag or small sandwich bag to fill the cannoli.  Refrigerate until ready to use
  7. Remove cannoli from oven allow to cool well.
  8. Remove cannoli form and fill with ricotta mixture.
  9. Once filled, you can garnish as you like with nuts, or fruit and whipped cream or light cool whip.

Nikki's Clicky Mousse


Hey! Remember me? I post food sometimes!

Foodies, indulge me a personal reflection moment. I am of the school of thought that self-care is very important and that there are aspects of your feelings and motivations that you should listen to and heed. So when you see that I haven't been posting for a while that usually means I've burned myself out. I live a pretty full life between being a single mom to the divas, my day job, this blog and the million and two things I sign up for. So every once in a while I just stop. And it's good for me because it allows me to be enthusiastic about the time when I go!

Anyway, back to the grind.

This is one of those recipes I THOUGHT I already had on the blog, came on to double check an ingredient and found that it was not!

You don't know how much I wanted to call this "Clicky pudding" (so I could sing about it to the tune of "We Wish You a Merry Christmas") but honestly the texture is of a mousse. Specifically, if you've ever had Jell-O Mousse Temptations. THAT texture. Lookit:


And here's my recipe!

Nikki's Clicky Mousse
(Makes approximately 6 servings)

Ingredients:
  • 1 box sugar-free, fat-free chocolate pudding mix
  • 2-3 scoops Click Espresso Protein, Mocha flavor (the more you put in, the more "mousse-y" it is). You can use regular Mocha or Mocha Decaf, doesn't matter.
  • 1 tbsp. unsweetened cocoa powder (just makes for a deeper chocolate taste)
  • 2 additional packets of no-calorie sweetener (balances out the bitter that is created by the extra cocoa + the espresso)
  • 2 c. milk (I use skim)
Directions:

In a large mixing bowl, whisk together pudding mix, Click, cocoa powder and sweetener until well blended.

Add milk. Now, you can either whisk it (although this is going to get difficult after a point because the protein in the click "tightens" the mixture up a good bit) OR you can do what I do and go at it on medium speed with a hand mixer. Much smoother final product!

For fun you can add other things you like: Sugar-free syrups (hazelnut goes especially well in this one). As you can see I top mine with lowfat whipped cream. Usually I put a dusting of Fiber One crumbs (yes, I love the stuff that much!). Right now I am absolutely in love with eating desserts out of stemless wine glasses.

The protein in the Click increases the volume of the pudding, which is why I say it makes about 6 servings, but it really depends on your appetite. It could be more, could be less.

Either way it's yummy so enjoy!!!

Melissa's Protein Cookies


Have you enjoyed reader submission week? Good! Just remember, though, you don't have to wait for me to ask you for recipes. If you make a great recipe you want to share, write it up, snap a picture of the finished product and email me at bariatricfoodie@yahoo.com!


Our final offering this week is from Melissa R., who is from Pittsburgh.  I've actually met Melissa in real life. And one of her twin sons has actually been published on this blog before for making uber-nummy and WLS-friendly mozzarella sticks


Melissa loves to get her boys involved in the kitchen and believes (as I do too) that having them help is a great way to get them to open their minds to healthy eating!

With that said, Melissa set out to make some cookies. She reports the results are absolutely delicious!


Melissa's Protein Cookies

  • 3/4 c. no-calorie sweetener (Melissa used Splenda, which measures 2:1 with sugar [for every two cups sugar, 1 cup Splenda], check your sweetener's website to get the conversion for 1.5 cups sugar)
  • 1 c. rolled oats
  • 1 c. vanilla why protein powder
  • 1/2 c. soy flour
  • 1 3/4 tsp baking soda
  • 1/2 tsp baking powder
  • 1/2 tsp salt
  • 2 tsp ground cinnamon
  • 1 tsp ground nutmeg
  • 1 tsp ground ginger
  • 1 tsp vanilla extract
  • 1 can (10 oz) pumpkin puree
  • 3 tbsp 0% plain greek yogurt
  • 2 eggs
  • 3 tbsp flax seeds (ground)
  • 1 c. chopped fresh cranberries
  • 1/2 c. chopped walnuts (optional)

Directions

  1. Preheat oven to 350 degrees F (175 degrees C).
  2. In a large bowl, whisk together Splenda®, oats, protein powder, soy flour, baking soda, baking powder, salt, cinnamon, ginger and nutmeg. Stir in pumpkin, yogurt, and eggs. Stir in flax seeds, cranberries, walnuts, if desired. Roll into 48 large balls, and flatten on a baking sheet, or use mini muffin tin and make mini muffin.  I have done both and they turned out well both ways!.
  3. Bake for 9-12 minutes in preheated oven. DO NOT OVERBAKE: the cookies will come out really dry if overbaked.
I applaud Melissa, as I have never attempted protein cookies before. Hers look fabulous! If you have any questions for Melissa about her cookies, leave them in the comments and I'll get them answered for you!

Carissa's Cinnamon Muffins


Ok, I just have to say...you guys are cooking up some yummy stuff! I am IMPRESSED with what I've received.

There's still room if YOU have a recipe to submit for the Foodie Nation. I always make good use of submissions but this week is devoted to what YOU are cooking! Email me at bariatricfoodie@yahoo.com for details on submitting a recipe.

Today's offering is from Carissa. She got the idea for her Cinnamon Muffins from our girl Shelly at The World According to Eggface. She liked the protein muffin idea and decided to play with it and make it her own!

Here's how it goes down.

Carissa's Cinnamon Muffins


Ingredients

3/4 c. whole wheat pancake mix
1/2 tsp cinnamon
1/2 tsp baking soda
2 tbsp splenda brown sugar
2 scoops vanilla protein powder
1/2 c milk
1/4 c. sugar free pancake syrup

Instructions:


  1. Preheat oven to 350 degrees.
  2. Combine pancake mix, baking soda, cinnamon, brown sugar, protein powder and milk in a medium bowl.  Stir until smooth.
  3. Fold in syrup.  I like to not completely mix in the syrup as it adds a little extra syrup surprise in the final product...but its up to you! :)
  4. I pre-grease my muffin tins so they come out easier after...but again, your prerogative!
  5. Pour mixture into muffin tins until they are about 3/4 full
  6. Bake for approximately 16 minutes
Carissa really likes these muffins but report that they sometimes flatten out on her. For that, I have this to offer. Whenever making baked protein goods, investigate using double-acting baking powder. I could get into a lengthy chemistry explanation, but these guys do it better than me

The bottom line: Double-acting baking powder gives you more time to work with your batter (which you may need when incorporating protein). Also remember that, as a general rule, baked protein goods require about double the leavening agent of their non-protein counterparts. So if a recipe calls for 1/2 tsp baking powder, for a protein version you'd use a full tsp and so on. Reasoning: it's heavier. It takes a bit more "muscle" to get it to rise! (I know we can ALL understand that analogy!)

So in the above recipe, I'd suggest 1 full teaspoon of double-acting baking powder. You can find it in Wal-Mart (Great Value even makes it!) and it costs less than $2. 

If you want a "smack yo momma" good topping for this, here's something I've used on cinnamon stuff in the past:

Nik's Cinnabon Topping

1/4 c. Lowfat (Neufchatel) cream cheese, softened
2 tbsp. unflavored Greek yogurt
No calorie sweetener, to taste
Optional: A "splick" of apple pie spice

Mix it all in a bowl then refrigerate for about 30 minutes before smearing onto a muffin. It's best with this one if you "smear as you go."

Thanks Carissa for sharing your muffin recipe. Keep playing with your food!

Melissa's Oatmeal, Walnut and Cranberry Protein Cookies


It really warms my heart when one of my Foodies plays with their food and sends me recipes and pics. I ask for it all the time! And sometimes my wishes come true!

Today’s offering is via my good friend, Melissa. I had the pleasure of meeting Melissa when I came to Pittsburgh for the Bariatric Foodie Holiday Food Tasting (also known as the weekend the Ravens kicked the Steelers butts in their own back yard…just sayin’).

Melissa is a busy mom of two boys and she’s been a reader for quite some time. After seeing my posts and others about healthier approaches to cookies this holiday season, she decided to come up with a recipe for a protein cookie. The above was the delicious result!

If you have any questions about Melissa’s recipe, leave them in the comments and I’ll be sure to ask her to address them. And if YOU have been playing with your food, share with your fellow Foodies! Send any recipes and pics you'd like to submit to bariatricfoodie@yahoo.com. I am always looking to feature YOU!

Enjoy!

Melissa's Oatmeal, Walnut and Cranberry Protein Cookies

Ingredients:

3/4 cup SPLENDA® Granular

1 cup rolled oats
1 cup vanilla why protein powder
1/2 cup soy flour
1 3/4 tsp baking soda
1/2 tsp baking powder
1/2 tsp salt
2 tsp ground cinnamon
1 tsp ground nutmeg
1 tsp ground ginger
1 tsp vanilla extract
1 can pumpkin puree
3 tbsp 0% plain greek yogurt
2 eggs
3 tbsp flax seeds (ground)
1 cup chopped fresh cranberries
1/2 cup chopped walnuts (optional)

Directions:


1. Preheat oven to 350 degrees F (175 degrees C).

2. In a large bowl, whisk together Splenda®, oats, protein powder, soy flour, baking soda, baking powder, salt, cinnamon, ginger and nutmeg.

3. Stir in pumpkin, yogurt, and eggs and mix well.

4. Stir in flax seeds, cranberries, walnuts, if desired.

5. Roll into 48 large balls, and flatten on a baking sheet (Or use mini muffin tin and make mini muffin. Melissa tried both and reports both turned out well!)

6. Bake for 9-12 minutes in preheated oven. DO NOT OVERBAKE: the cookies will come out really dry if over-baked.

Kitten's "Love Potion #9" Protein Frosting

Is it wrong that I wanna bust out in the "cuppie cake song"?

You ever get wind of an idea that was so good you wish you had thought of it?

But you can’t. You really can’t. It’s not honest or ethical — even if it would earn you a place of eternal glory.

This is one of those moments for me. This was not my idea, but an idea passed to me from my friend Leslie (KittenLove on Obesityhelp) who modified this recipe from something she saw in a fitness magazine. It sounded intriguing and, since it had peanut butter in it, I decided to give it a whirl. (Justification, anyone?)

She presented it as an idea for a snack. A pudding, if you will. True, when I first made it, it was very pudding-like. But a night of partying in my fridge turned it into something even more spectacular. Especially when I paired it with my Chocolate Thingamijigee Protein Cupcakes.

So it is with great pride I present to you…
Kitten’s Love Potion #9 Protein Cake Frosting

Ingredients:

1 tbsp your favorite peanut butter
1 scoop of your favorite chocolate protein powder (I used this)
3 tablespoons milk (For the batch shown I used skim milk. The batch before that I used Hood Calorie Countdown Chocolate milk. Both turned out divine but the version with the chocolate milk was a bit rich.)
Optional: 1 tablespoon whatever sugar-free syrup you like (I didn't use any this time but I would recommend Sugar-free Hazelnut syrup for a Nutella kind of thing.)

Directions:

Nuke peanut butter in the microwave until liquidy (about 45 seconds did the trick for me).


Add in protein powder and mix until it is the consistency of wet sand.


Add your milk, and stir until smooth then add your syrup and stir again.


Refrigerate about two hours (I did overnight but 2 hours should do the trick).

And that's all there is to it, folks! That looks and feels like icing!!! With virtually no carbs (there are a few but not many) and loads of protein. Since this is enough to ice more than one cupcake the fat amount is broken up a little but even that isn’t bad (one tablespoon of peanut butter has about 8g of fat). And honestly…when did you ever hear of cake icing being GOOD for your plan?

Since I gave a link to the stats for the cupcakes I figured I'd chime in with the basic stats of the frosting (again, your stats depend on the ingredients YOU use). The frosting covers six cupcakes and for each cupcake's worth is 44 calories, 5g of protein. I only make one batch at a time because, for me, even protein forward foods can become triggers in large quantities. Your mileage may vary!

I’m going to try this out in a vanilla variety with some almond butter. Anyone care to try it with me and report back on the results?

Nik's Chocolate "Thingamajigee" Protein Cupcakes

Note to self: with kickass new blog design, sucky phone pics are no longer acceptable!!!

Oh…what should come first? The cupcake or the icing? Decisions, decisions!!!

For those that don’t know, I am a protein baking freak. Yes, I know of the Pillsbury Sugar-Free cake and brownie mixes and accompanying frostings. I appreciate the fact that Pillsbury is trying to offer sugar free choices for people who want to partake of their products.

But here’s the thing. Just because something is sugar-free doesn’t make it great for you. This is not an admonition of the products. I think if you can tolerate the mixes well and want to bake yourself a birthday cake or something special, that’s a valid choice.

But I have this crazy, possibly fool-hearted and heretical belief that there is a way to bake things that actually CAN fit well into your plan. And that is where my mission lies, people.

If you’ve ever checked out the recipe index, you’ll know that I’ve done my fair share of experimenting with protein baked stuff. These cupcakes? Whole. Other. LEVEL. To quote that really funny bird in Rio (can’t remember his name offhand) “This ain’t the level. The next level is the level…”

So let’s dig in (literally).

Nik’s “Thingamajigee” Protein Cupcakes
(I’ll explain the name in a moment. Anyhoo…recipe yields 24 regular sized cupcakes. Adjust as per your own needs.)
Wet Ingredients:

3 overripe bananas (NOTE: if you don't want to use bananas, sub in 1.5 c no-sugar added applesauce)
2 eggs (or equivalent liquid egg substitute)
1.5 cups no-calorie sweetener (I’m on Team Splenda)
1 tsp cinnamon
¼ tsp. nutmeg

Dry Ingredients:

1 c.
Atkins All-Purpose Baking Mix
1 c. chocolate protein powder (I used this)
¼ c. unsweetened cocoa powder
1/8 tsp. salt
3 tsp baking powder (yes, I did say 3)

Directions:

Pre-heat your oven to 350. If you are me, this entails re-lighting the pilot, kicking the oven three times, turning it up to broil and then back down to 350, but I digress…

Mash the bananas up in a mixing bowl (or simply add applesauce, if that’s what you are using). Why the bananas/applesauce, you might ask? Both provide a LOT of moisture for your end result without adding the fat of butter or oil. I don’t generally add oil to my baked goods, but your mileage may vary!

Add in the rest of the wet ingredients and stir until eggs are fully incorporated.

From here, what I do is usually put the dry ingredients in a sifter and sift it directly into the wet ingredients. You can either do that or mix them in another bowl, your choice. Stir wet ingredients and dry well until the mixture is the consistency of a pudding.

Line a cupcake pan with cupcake cups and add one heaping tablespoon of the batter to each. Remember to tap down your pan after you’re done (just tap it against the counter to ensure there are no air bubbles at the bottom).

Pop the pan in the oven for about 12 minutes. I may sound like a broken record but I cannot say this enough. Protein baked goods cook a LOT faster than their regular counterparts. The outside forms particularly quickly. I’ve found 12 minutes to be the perfect cook time in MY oven. Yours may be different. So don’t leave the kitchen. Go do something else while these are baking (tune in tomorrow for the protein icing recipe and that can be what you are doing…).


Remove from the oven when a toothpick inserted in the center comes out clean. Allow them to cool fully before trying to eat one. All that will happen if you try to eat them hot is that most of your cupcake will stick to the liner. That’s no fun.

Now…the Thingamajigee. Well I went into this trying to simply make a cupcake variation of my Protein Banana Rum Cake but discovered (horror upon horrors!) that I was out of vanilla protein. Being that it was 4 days before payday and your girl Nik is not independently wealthy, I switched gears and used what I had.

Chocolate and banana is a pretty common combination but I wasn’t sure about the spices I’d already added (cinnamon and nutmeg). But they came out really, really good. The divas even liked them a lot. The cinnamon and nutmeg gave the chocolate a more complex flavor. But I was still a bit nervous because the protein frosting would add yet another flavor to the mix.

What flavor is that? Tune in tomorrow and find out!

For now, anyone wanting MY stats on these cupcakes (without frosting) click here!
Related Posts Plugin for WordPress, Blogger...