Your Quest Bar orders help create more giveaways. Order today!

NEW! Working Search Button! USE IT!!!

Love BF as a blog? You'll love it even more as an e-mail newsletter. Get recipes, tips and more!

#PWMF Recipe Contest Dinner Winner: Erin's Creamy Chicken Fajita Soup


(Heh...Dinner Winner...ok...moving along...)
 
Dinner! I don’t know about you but it’s always been a challenging meal for me.

I think it’s the finality of it all. Like dinner. It means you’re, like, done. With food. For the rest of the day. (In my head.)

My issues aside, a good, WLS-friendly dinner the entire family can eat is worth its weight in gold. It means you don’t have to play short-order cook to your family and you can all sit down and eat the same thing at the same time (theoretically). That’s important.

Hillery, our dinner judge, is a working girl. She manages to pack a lot into her day and now she’s having a baby! So she was looking for a good dinner that doesn’t take long to make, that both she and her hubby can enjoy.

Here’s her pick.

Erin’s Creamy ​Chicken Fajita Soup

Ingredients:
  • 4 C. boneless, skinless chicken breasts , shredded
  • 1 whole onion, diced
  • 1 (28 Oz. Size) Can Stewed Tomatoes
  • 2 (14.5 Oz. Size) Cans Great Northern Beans
  • 2 (14.5 Oz. Size) Cans of Sweet Corn
  • 2 (14.5 Oz. Size) Diced Carrots
  • 8 C. Low-Sodium, Fat-Free Chicken Broth
  • 8 Oz. Plain Greek Yogurt
  • 1 Package of Fajita Seasoning
  • Garlic Powder. Salt, Pepper to taste
Add chicken breasts to slow cooker. Add enough water to cover meat and cook on low for 6 hours. Take cooked chicken out, once cool enough shred meat. Set chicken aside.

Remaining liquid can be added with chicken broth.

Drain and rinse beans, carrots and sweet corn, set aside.

In stockpot, add diced onions and saute on low for 1-2 minutes. Add chicken broth, remaining liquid and greek yogurt. Bring to a boil and stirring constantly until smooth.

Add to stock pot, whole can of stewed tomatoes, package of fajita seasoning, beans, carrots, sweet corn and chicken.

Reduce heat, add garlic powder, salt and pepper to taste. Simmer for 10-15 minutes.

Note: If you have picky eaters at home, I puree my beans and tomatoes prior to adding.

Additional add ins depending on tastes:
  • Hot Sauce
  • Diced Jalapenos
  • Diced Green Chilis
  • Use 1 can of Black Beans, 1 can Great Northern Beans
  • Reduced Fat Cheddar Cheese for topping
Unfortunately, Hillery had a family emergency (NOT the baby!) that has prevented her from snapping a pic of Erin's dish, but she assures you all that she loved it and will snap a pic and send it in very soon. I'll update when I get it.
 
Congrats, Erin! Keep playing with your food!


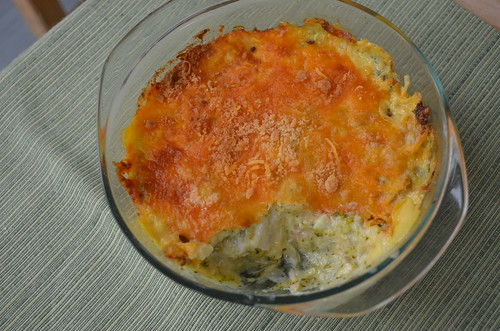
Cheesy Chicken & Brocolli Bake

Cheesy Chicken & Brocolli Bake - The final shot
For reasons unknown (probably climate change or something), Baltimore has been decidedly fall-like this week.

Unlike many of you, however, I consider it blasphemous to consume anything with pumpkin in it outside the months of September through December. So no pumpkin lattes or protein shakes or the like - yet. But I have been using my oven more, which is nice. Comfort food almost always comes from the oven.

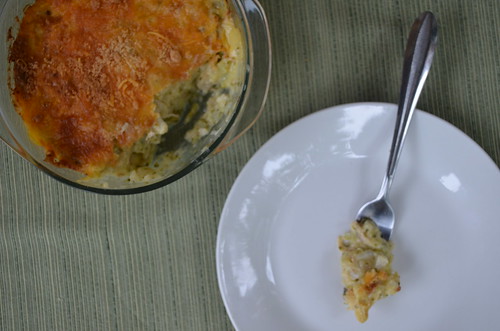
And this easy bake is comfort food at its best. Now I made it from raw veggies (cauliflower, broccoli) but you can easily use frozen for a quick weeknight prep. The amounts listed yield this lovely little casserole dish (notice it isn't much bigger than the salad plate it's sitting next to) full of  yumminess.

Nik's Cheesy Chicken & Brocolli Bake

Ingredients:
  • 8 oz. chicken (I used thighs, use breasts if you like those better)
  • 1/2  a large head cauliflower, cut into florets OR 2 cups frozen cauliflower florets
  • 1 small head of broccoli OR 1 cup frozen broccoli florets
  • 8 oz. can reduced-fat cream of chicken soup
  • 1 cup whatever shredded cheese you like (I used Mexican blend)
  • 1/2 cup grated Parmesan cheese
  • Salt, pepper, onion powder, garlic powder, to taste
  • Optional: 1/2 an onion diced and/or more veggies (I didn't javascript:;use onions because it would have required another pan and I didn't want to dirty one!)
Directions:

Pre-heat your oven to 350 degrees. Season chicken thighs and place them on a baking sheet. Bake until done. Once done, remove the skins and transfer to a rack to drain of excess oil. If you are using chicken breasts, I'd advise the morning before you make this you use my meat marinating method (which makes it so tender that most newbies can even tolerate it) and then proceed to grill the chicken in whatever manner is easiest for you (I use my Foreman Grill).

While the chicken is baking set a small pot of water on to boil. When it is boiling, add both the cauliflower and broccoli florets and cook until fork tender, about 5-7 minutes. Drain.

Now here's where your personal style comes into it. I personally pick the broccoli out and mash the cauliflower in a large bowl then add the broccoli florets back in. If you're looking at this post going "Ain't nobody got time for that!" then it's perfectly fine to mash it all together. The broccoli will not yield willingly though!

Cut your chicken into the appropriate sized pieces and add it to the bowl and mix. Then add your soup and mix again. Transfer all this to your small casserole dish and top with grated cheese, then with Parmesan.

Bake for about 30 minutes or until cheese is as melty and brown as you like it.

This is a really easy, really comforting meal, especially if you're one of those people, like me, whose pursuit of protein almost always leaves you missing out on your veggies! Here's a few more shots I took of this dish. Enjoy!

Cheesy Chicken & Brocolli Bake


Cheesy Chicken & Brocolli Bake

Alfredo Chicken Roulade


So I may have mentioned once that when I get on a kick, I sorta just ride it out until I get sick of whatever I was obsessed with.

Or maybe I didn't.

At any rate, the Chicken Roulade I made while in Michigan with Pam inspired this version - Alfredo!

Enjoy. (Wow...I feel compelled to write four more paragraphs but oddly I'm going to stop there!)

Nik's Alfredo Chicken Roulade

Ingredients:
  • 1 tbsp. extra virgin olive oil
  • 1 red bell pepper, cut into strips
  • 1/2 an onion, cut into sliver
  • 2 c. baby spinach
  • 6 thin-cut chicken breasts
  • 6 wedges Laughing Cow cheese (I used Garlic-Herb)
  • Salt, pepper and any other spices you like
  • 1 jar light Alfredo Sauce (I used Classico)

Directions:

Preheat your oven to 350 degrees. 

Set a skillet over medium heat and allow it to get HOT (this will take about 5-ish minutes...go get the other stuff to make this while you are waiting).

Add the oil and swirl it around the pan before adding bell peppers. Saute about 2-3 minutes before adding onions. Saute that an additional minute or two before finally adding the spinach. Saute all veggies until spinach is wilted to your liking.


On a cutting baord, lay out your chicken breasts (TIP: If you can't find thin-cut chicken breasts at your grocery store, usually the butcher will cut some for you, just ask! Also if chicken breast is too big for you, you can pound out some chicken breast tenderloins). Add salt and pepper to both sides. Then on the side facing up, spread your Laughing Cow Cheese all across it. 


Plop some veggies on top of that and then roll up the chicken breast. Transfer it to a baking dish and add Alfredo sauce to the top!


Bake at 350 for about 45 minutes or until the chicken is done through. 

I served mine with some sweet peas, but this works well with any veggie you like. Yummy! Let's eat!


Chicken Roulade


I'm writing to you today from cloudy and cool Saginaw, Michigan, where I'm visiting my friend Pam (of "The Journey to a Healthier Me" or you all would best know her as the cover designer of all of Bariatric Foodies fabulous book offerings on Amazon!).

She's been showing me all sorts of lovely places and I'm having a blast. We've been to Frankenmuth (and I could have kicked myself for not taking my camera around on that walk but I did manage to snap a few good pictures before my phone conked!) and yesterday we went to Dow Gardens (I love nature! I'm a city girl so I don't get to commune with trees much) and Lansing to a store called Horrocks.

Now on the surface one might ask if a grocery store is truly a tourist stop for an out of town friend. I'd say when that out of town friend is me...um yes. Seriously. I want to live in that place! They have every fruit and vegetable known to man, they have all the products we love (sugar-free Torani syrups, PB2, etc.) for CHEAP and...get this...free gourmet coffee. As in free. As in you don't have to pay for it.

(I know..."Shut the front door!")

S'anyway our goal in going to Horrock's was to get yummy dinner fixings. It'd had been an active day and I wondered what we could make that wouldn't be too taxing. Then a simple, elegant dish a friend taught me came to mind: Chicken Roulade (I've featured the dish here before when I had my Laughing Cow Light Cheese Party. Click here to check it out!).

That's basically a fancy way of saying you tenderize and pound flat some chicken breasts, fill them with veggies and cheese and top with a sauce.

YUM! Check out the process of me making our Chicken Roulade, then head over to "Feed My Sleeve" and let Margaret share her full recipe for this tender, moist, delicious meal!


First I sauteed some veggies in a little bit of extra virgin olive oil. I used spinach, orange bell pepper, tomatoes and onions (I have a thing about color). 


After that I pounded out some chicken breasts (not shown) and seasoned them. Then I spread Laughing Cow Light (French Onion in this instance) on one side. 


Then I plopped some veggies on top of that and rolled the chicken into a spiral.


I placed all my chicken spirals in a baking dish and put the leftover veggies on top.


Finally, I topped with sauce, in this case Emeril's "Roasted Gahhhhlic" Sauce (that is actually how it's spelled by the way!)


And here it is fresh out of the oven. Yum! We had our Chicken Roulade with roasted asparagus and a seven-grain salad I picked up at Horrock's. I have a bit of a bigger pouch capacity so you all probably won't be able to eat all that, but it was a yummy, delicious and balanced meal.

If you can't eat much, try making these with chicken breast tenderloins instead of full breasts (I couldn't eat a whole breast. I had to cut in half). 

Margaret's Chicken Roulade featuring Laughing Cow Light Swiss


This recipe is dedicated to all those people who think that eating tasty, healthy food has to be laborious.

Margaret is here to tell you that's not true!

She was our fabulous host for the Laughing Cow cheese party and a great friend of mine!

This is the picture of her chicken roulade, but I'm sorry, I'm gonna send you over the her new blog, "Feed My Sleeve" for the recipe and instructions. Be sure to bookmark her page as she's going to feature her world-class cooking (she cooked for Gordon Ramsey as an audition for Master Chef!) from a weight-loss surgery perspective!

But here also are a few "bonus" pictures, taken by my very own Grade Diva! (My oldest daughter)


Margaret spreading the Laughing Cow cheese onto her pounded chicken breasts.


Margaret rolling up the roulades after stuffing them with asparagus and other yummy veggies! (You can use whatever you like.)


This roulade sauce also doubled as the topping for the savory cheesecake!


...and of course I have to give a shout out to Widget, Margaret's impossibly adorable dog!

Nik's Berry Chicken Salad

Forgive me, Foodies! Both for the less than ideal pic AND for totally missing the potential Independence Day connection. :)

Chicken is a staple in my household. And for my family - me, the two divas, dog and cat - it is most economical to buy a whole chicken rather than buying packs of chicken pieces.

The elder diva loves all things chicken, while the younger HATES any meat with bones (she's about a hiccup from being vegetarian). The dog just likes meat. The cat is indifferent to everything except tuna.

So that is to say that there are a lot of needs to fill and whole chickens usually do the job. And chickens have a definite life-cycle in my household. Usually I either roast it whole or cut it into parts (contrary to public opinion, butchering a chicken is neither hard nor particularly time-consuming). Either way we have our first initial meal from it then I leave it for leftovers for a few days.

After that, the meat is up for grabs and I make things with it like my curried chicken or chicken-bacon ranch salad. With whole chickens, once I've picked the carcass I usually use it to both make broth/stock and to make a simple gravy my dog seems to love mixed in with his food.

So yesterday was "chicken pickin'" day. And I knew I wanted to make chicken salad for lunch but I wanted something different. Here's what I came up with!

Nik's Berry Chicken Salad
(Makes about 2-4 portions, depending on your pouch capacity)

Ingredients:
  • 1 c. shredded chicken meat (I used breast meat)
  • 1/3 c. unflavored Greek yogurt (I used 0%)
  • 1 heaping tbsp lowfat mayo (you can use fat-free if you want, I never will!)
  • 2 tbsp. your favorite raspberry vinaigrette (I used this)
  • 1/8 tsp. ground black pepper
  • A dash of garlic salt
  • 3 strawberries (that are just about ripe), sliced
  • 1/4 c. blueberries
  • Optional: any other berries you like + a handful of toasted nuts might be nice for crunch. I didn't have any.
Directions:

In a cup, combine Greek yogurt, mayo and dressing and stir until it resembles yogurt. (It will first be sort of clumpy but if you stir it for a minute or two it'll smooth out.)

Put your shredded chicken in a bowl and add spices to the chicken. Mix thoroughly.

Add yogurt/mayo mixture (Note: if you don't want to use mayo, try a drizzle of olive oil but you do need a little bit of fat. Greek yogurt alone doesn't hold well in chicken salads without giving off a "dry" aftertaste). Mix thoroughly.

Lastly add your berries and nuts, if using them.

This was a delightful surprise. Interestingly the black pepper is the star of this thing. The pepper against the berries and the savory chicken is quite nice! I ate this straight out of the bowl for lunch. They would also be good on a plain rice cake or with some whole wheat crackers if that's your thing.

Mama Foodie's "Chicken & Rice" Remixed


When I was little and it snowed outside, my mom would always make us "Chicken & Rice." Even in the years before she died every so often she'd call me up and say, "Nikki, I made some chicken & rice. Come over and have some."

Here's my food memory of the dish.

Looking back, it usually followed my mom cooking a whole chicken. After we had it for dinner she'd let it sit in the fridge for a few days so we could make chicken sandwiches and chicken salad. Then she'd retrieve the carcass and make chicken & rice. Somehow in my memories this always coincided with snow or freezing temperatures.

Chicken & Rice was an interesting concoction. It put to use whatever spare veggies my mom had and she always boiled the chicken until it was beyond tender, almost like little threads of delicious meat. And there was always pepper. Lots and lots of black pepper, just as all my mother's dishes had because she loved pepper so much.

Anyway, we recently got some winter weather in Baltimore and, being the holidays, I miss my mom something awful. So in her honor I set out to make a healthier version of this dish, both because I am passionate about healthy comfort food and because it makes me feel just a little bit closer to her.

The version I made was indeed comforting and I think it'd be a good meal for those on soft foods or just starting out with meat. So from Mama Foodie to me to you. Enjoy.

Mama Foodie's (Remixed) Chicken & Rice
(# of servings varies. For my 5 year-old pouch this makes about 6 servings)
Ingredients:

  • 4 cups of an assortment of chopped veggies of your choosing (In mine is a large onion, chopped, half a HUGE zuchhini, diced and about half of an eggplant diced. For newer pouches you might want to stick to squash as it gets very soft.)
  • Either the remnants of one chicken carcass (meaning there's still good meat on there but nobody feels like picking it off) or 2 large chicken breasts (HINT: try my post-op meat marinating technique to make sure your meat gets super tender!)
  • 1/2 of: salt, black pepper, garlic powder, onion powder + 1 bay leaf
  • 3 c. water
  • 1 can lowfat cream of mushroom soup
  • A batch of cauliflower rice (newbies, do not eat unless you are cleared for cruciferous veggies)
Directions:

Spray a large pot down with nonstick cooking spray and sautee veggies until tender. 

Add chicken carcass or chicken, along with water and spices and turn the burner to low (if you have an electric oven, like a 2 or 3 setting) and allow it to cook one hour. 

If using chicken carcass, remove the bones (the meat should have fallen off on its own) and discard. If using chicken breasts, pull meat apart with two forks. Taste and adjust seasonings as you see fit but remove the bay leaf.

Add soup and stir then simmer over low heat for an additional 15-20 minutes.

Serve over cauliflower rice.

You can also just throw the sauteed veggies, chicken, water, spices and soup in your crockpot and cook on low for 4-6 hours. Works basically the same, I just didn't feel like hauling out my crockpot!

This is warm and comforting and tastes just like mom used to make but just a little bit healthier.

Samantha's Weight-Loss Surgery Friendly Chicken Divan


Not long ago, I held an informal webinar for a few merciful adventurous Foodies to help me test out new webinar software (more on that in a moment). I called it "Pimp My Recipe" and invited folks to bring recipes they wanted to make WLS-friendly.

Now I consider myself a pretty experienced Foodie but there are a few dishes I've never tried before and thus look to you guys to help make it over. Such was the case with Chicken Divan. My buddy Kim wanted to remake it, so thankfully my other buddy Samantha took on the task.

Here's the original recipe:

2 cans cream soup,
1 cup mayo,
1/4 cup lemon juice
About 1 to 2 tablespoons of curry
1 bag of frozen vegetables
boneless skinless chicken breasts cut into chunks
2 cups of Cheddar Cheese
1 big can of fried French onions


As you can probably tell, the trouble with this recipe is it's full of FAT! It's got cream soup, mayo and cheese in there. Which almost guarantees it is super yummy but unfortunately for many of you it also means it can make you very, very sick. So here is...

Samantha's Weight-Loss Surgery Friendly Chicken Divan

2 cans or one really large can of Low fat cream of mushroom soup,
(you can make your own as well)
1 cup plain greek yogurt, - (you can also use cultured coconut milk
instead of mayo or greek yogurt)
1/4 cup lemon juice
About 1 to 2 tablespoons of curry
1 bag of frozen vegetables (I use a broccoli cauliflower mix)
1 bag frozen and shelled edamame
4 boneless skinless chicken breasts cut into chunks
2 cups of Cheddar Cheese
1 big can of fried French onions


And here's how she says to make it:

(Nik Note: If you have trouble with chicken, check out my sure-fire trick to marinating meat post-WLS the night before you plan to make this!)

Preheat your oven to 400 degrees. 


Mix everything except cheese and French onions in a bowl and then place in a 9x13 pan and bake until the chicken is almost done then add cheese and French onions to the top until the cheese is lightly browned.


You may need more Greek yogurt depending on how much sauce you actually need to coat everything.


This is typically served over rice I now serve it over quinoa instead (Nik Note: You can also use cauliflower rice). I do not use low fat cheese nor do I skip the fried French onions. Mostly because even replacing all of the mayo this is still a treat in my household and not a weekly meal. We maybe eat it once a month and because I eat such a small portion I decided to keep those two things in this recipe.


I think Samantha executed the principles of recipe remixing (some of which we discussed on the webinar) perfectly! Making sensible swaps and preserving (in moderation) the core elements of the dish are important things to do. Thanks, Samantha!

Now about these webinars. If you purchased a Bariatric Foodie Holiday Survival Kit or recipe e-book from the "Shop BF!" page, I have set up TWO webinar times for you to ask questions about the recipes in the e-book and to get some advice on your own holiday recipes. The times are both 6 p.m. EST on Saturday, November 10 and Saturday, November 17. 

If you purchased a Kit or e-book already, click here to register for whichever date works best for you (they are both the same webinar, just two different times to fit people's schedules). If you've not yet gotten your Kit or e-book, there are still some available! I'm currently taking Kit orders through November 7 for shipment on November 10. The e-book comes instantly to your email upon purchase!

Gypsy's Cilantro Lime Chicken


Foodies...how do I love you? Let me count the ways...

Well, firstly, because you all are always on time! What do I mean by that? Well, if you haven't heard yet, the divas and I are moving! On May 5 to be exact. So you know what that means...not much recipe invention going on over this end until the big move.

But you guys always have me covered. I love when folks send me their recipes! It's always fun to peek into your kitchens.

This one comes to me from my fabulous friend (and Bariatric Foodie Pledge enthusiast) Gypsy!

Here's what she had to say:

This is what we are having for dinner tonight. So yummy and my oldest actually requested the Cilantro Lime Chicken ;). Full of protein and flavor!! Enjoy
~Gypsy
Gypsy's Cilantro Lime Chicken
Ingredients
  • 4 boned, skinned chicken breast halves (2 lb. total)
 (i'm using chicken tenders) 
  • 1/4 cup lime juice
  • 1/2 cup chopped fresh cilantro
  • 6 cloves garlic, chopped
  • 1 tablespoon honey
  • 1 tablespoon olive oil
  • 1/2 teaspoon salt
  • 1/4 teaspoon pepper 

Preparation

(BF Note: This recipe would also be great if you use the "BF Secret to Marinating Meat" for tender meat every time!)
  1. 1. Pound the chicken breasts to an even thickness (about 1/2 in.) and place in a shallow baking pan.
  2. 2. In a small bowl, mix lime juice, cilantro, garlic, honey, olive oil, salt, and pepper. Pour over chicken and turn pieces to coat evenly. Cover and chill at least 30 minutes or overnight.
  3. 3. Lay chicken on a grill over medium heat (you can hold your hand over the surface only 4 to 5 seconds) and cook, turning once, until no longer pink in the center, 4 to 6 minutes per side.
 ...And get this...Gypsy gave us a two-fer! 
Cilantro Bean Salad

Throw some kidney beans & garbanzo beans in a bowl- drained and rinsed, with some lemon juice and olive oil, garlic salt & red onions & cilantro. Refrigerate & eat for a snack or lunch! Better the next day when all the flavors meld together.   

Thanks Gypsy for those great recipes! If YOU have a recipe to share with the Foodie Nation, hit me up! I'd love to feature you. 

Cheesy Chicken, Broccoli & "Rice" Casserole


Ok, so let’s talk about condolence food.
You know what I’m talking about. Someone passes away and family, friends, people you hardly even know start bringing you food. Yummy food. Comforting food. Carby food.

For my part, I have sort of been picking at the condolence food, much to the chagrin of La Petite Diva who has appointed herself my grief counselor. It is her mission to ensure I get three squares a day and I was NOT doing that for a minute. (After employing some good old fashioned Chinese water torture she has reformed me.)

But all that is to say this dish is what I call a “recovery” dish. I needed some vegetables in my life. BAD! The children did too. Although La Grande Diva nearly fainted away of sheer joy upon receipt of a gamillion piece box of fried chicken from Super Wal-Mart (who even knew they SOLD fried chicken???)

To get us all headed back down the right eating path, I fixed this casserole. Interestingly it passes both girls veggie radars. Ordinarily the older girl loves broccoli and the younger hates it BUT I recently learned that there is an exception to that clause. We’ll call it the “cheese clause” and we’ll say it states “With liberal exceptions a small fraction of ordinarily unacceptable vegetables will be considered and perhaps even ingested with the addition of cheese.”

Broccoli falls under this clause. Hallelujah!

Nik’s Cheesy Chicken, Broccoli & “Rice” Casserole

Ingredients:
2 large chicken breasts, grilled and chopped into small pieces
1 small onion, finely diced
3 cups of cauliflower rice
1 package of frozen broccoli pieces (not florets…pieces…there is a difference)
1 can (10 oz.) of lowfat cheddar cheese soup
½ c. milk
1 c. each shredded sharp and mild cheddar cheeses
Salt, pepper, onion powder, garlic powder and any other spices you like

Directions:
  1. Fistly, if you don’t already, check out my no fail tender chicken marinating technique (included in this post) before preparing your chicken breasts.
  2. Preheat your oven to 350 degrees.
  3. Boil your broccoli until it is the desired consistency then drain.
  4. Sautee your onion in a pan with nonstick and add any desired spices
  5. In a large bowl, combine chicken, onion, cauliflower rice and cooked broccoli pieces. Add soup, milk and half of each kind of cheese and mix well.
  6. Transfer to a casserole dish and top with remaining cheese.
  7. Bake for 30 minutes or until cheese is melty.

If you are not cleared for cruciferous veggies like broccoli and cauliflower yet (or worried that these might upset your system...or just don't like broccoli and cauliflower) zucchini works great in place of broccoli and spaghetti squash in place of the cauliflower. It is still yummy and so comforting you won’t miss the carbs!

Nik's Zesty Skillet Mushroom Chicken

Better pic forthcoming...I promise! I made it yesterday for tonights dinner which...hasn't happened yet.


I’ve found, in my experience, that people either love mushrooms or they hate them. Every once in a while I’ll run into the rare person who says, “Enhhh, I can take them or leave them,” but again…that’s pretty rare.

Me? Definitely on Team Mushroom! I put them in egg scrambles, on tortilla pizzas, in casseroles…and now in this yummy and quick skillet dish.

But when I posted the picture of it on the Bariatric Foodie Facebook Wall yesterday, I was reminded of the polarizing effect of mushrooms (and mushroom sauce). To those who hate mushrooms I have this to say: play with your food!

Nik’s Zesty Skillet Mushroom Chicken

Ingredients:

1 lb. chicken breasts
Garlic powder
Onion powder
Salt and pepper
1 medium onion, cut into slivers
About 6-8 large button mushrooms, sliced
1 tbsp low-calorie butter stick (or butter, if that’s your thing)
10.5 oz. can of low-fat cream of mushroom soup
½ c. skim milk
2 tbsp. Dijon mustard

Directions:

IF YOU HAVE TROUBLE WITH CHICKEN:

Try my chicken marinating technique: place chicken in a zip-top bag with a container of unflavored Greek yogurt for a few hours. Do it in the morning before you leave for work and trust me, your chicken will be transformed! I’ve not yet a chicken intolerant person yet who hasn’t been able to eat chicken made this way, so give it a try! I promise, the yogurt cooks off and you will NOT taste it!

Once you are ready to cook, season your chicken with garlic and onion powders, salt and pepper on both sides. Then cook your chicken in a heavily sprayed skillet (don’t use your George Foreman or grill pan for this one. I’ll tell you why in a moment.)

When chicken is done, set it aside but don’t cut it yet. Let it reabsorb those juices! Meanwhile, toss your tablespoon of butter in the skillet and let it melt down, then add the mushrooms and onions. Cook until softened, stirring often. This is where the skillet comes in handy. The little bits of crud left by your chicken go into the onions and mushrooms, infusing it with flavor!

NOW dice up your chicken and return it to the skillet and stir.

Add your cream of mushroom soup and milk and stir that thoroughly and then taste. If you need more salt or pepper (I like a LOT of pepper in this), adjust. Let it come to a bubble.

Finally, add your two tablespoons of Dijon mustard and stir that into the entire mixture and let it simmer another five minutes or so.

This stuff is SOOOOO good! I am eating mine atop some cauliflower rice. If your family is into mushroom chicken, this would go well with regular rice or atop a REALLY crusty piece of bread (provided you can handle being around said crusty bread).

Chicken Enchiladas 2012


My New Year's Resolution (if you can call it that) is cleaning up the blog a bit. There are posts where I promise to post a picture later that I never did or an additional recipe that I never did. If you see any of these posts please, please, PLEASE hit me up. I need to fix it!

So my inaugural effort is my chicken enchiladas. I have a nice (albeit LONG) instructional video on how to make them but never posted the full recipe. Well, here it is!

These are a good recipe for when you want to be "bad" while being good. The ingredients all stand up nutritionally. You've got good fiber, protein, veggies, low-fat, the whole nine. For newbies, I'm sorry but you probably shouldn't eat this. BUT...if it helps...you have these to look forward to!

Nik's Chicken Enchiladas

Ingredients

1 lb. chicken breast meat, diced into small pieces
1 small onion, finely diced
1 small green pepper, finely diced
1 packet taco or fajita seasoning (whichever you like best)
1 package whole-wheat, low-carb tortillas (I use La Tortilla Factory taco-size)
2 c. shredded Mexican cheese, divided
1 can enchilada sauce

Directions

Preheat oven to 350 degrees.

Spray a pan down well with nonstick cooking spray and allow it to heat up. Add chicken and begin to brown diced pieces, chopping them smaller with a spatula as they cook.

When chicken is about half done, add the onions and peppers and continue cooking, mixing chicken and veggies together, until chicken is completely done.

Transfer to a bowl and mix with seasoning packet thoroughly.

Take tortillas out of package and microwave about 15 seconds to make the more pliable.

On a flat surface, lay out your tortilla. Take a slotted spoon and spoon about 1/3 c. of the chicken mixture to one side of the tortilla. Add a tablespoon or two (your choice) shredded cheese.

Starting with the side the chicken is on, roll the tortilla into a tube shape and fit it into a 9 x13 casserole dish. Repeat until you run out of tortillas or chicken meat - whichever happens first! (For me this makes about 8 enchiladas - your mileage may vary).

After enchiladas are all lined up in the casserole dish, empty the enchilada sauce over them and top with remaining cheese.

Bake in a 350 oven for about 30 minutes or until cheese is completely melted!

I can eat one of these, topped with salsa and Greek yogurt and a side of fat-free refried beans. But that's now. When I was newer out, I cut one in half and ate it the same way with a smaller portion of all the same things. The divas love these and although they know it is low-fat/lower-carb they don't care.

Just goes to show...good taste trumps everything!

Buffalo Chicken Salad

~by Nikki

Shown on a lightly salted rice cake, this chicken salad gets me over my "wing night" cravings!

We often tell you all to play with your food. Well, I thought I’d show you how I take our own advice!

This recipe was originally posted by my friend Shari (who someday will have her own awesome website with all her wonderful recipes). When I play with recipes, they tend to be hers. She shares my affinity for getting a lot of food for not a lot of calories and a freakishly large amount of protein. We are kindred spirits that way.

Anyhoo…I changed this up a bit to make the prep time a little quicker.

Nik’s Buffalo Chicken Salad
(my spin on Shari’s Buffalo Chicken Dip)

Ingredients:
1 large can chicken breast meat
1 tbsp light mayo (surprisingly, Wal-Mart brand seems to have the best stats)
2 tbsp 0% unflavored Greek yogurt
1 tbsp bleu cheese dressing (you can do light if you want…I don’t)
2 tbsp Frank’s Red Hot buffalo wing sauce
Diced onions
A dash of onion powder, garlic powder, salt and pepper

Optional: very finely diced celery if you are a year out or more. Celery is very stringy and can bother newer pouches! Some plans even prohibit it for life so check yours before using it.

Instructions:

In a bowl, fork shred your chicken chunks (they come out of the can HUGE) and mix them with the onions and celery, if you are using it.

In another bowl, mix together all wet ingredients. Taste test and adjust as necessary. I usually find myself adding more of the wing sauce if it’s just for me. The divas are content with the two tablespoons.

Mix your dressing into the chicken and coat it well. Chill for a bit before serving to let the flavors “get acquainted.”

I served mine on a lightly salted rice cake (from Aldi!). This also goes well on a multi-grain wrap or simply by itself for a nummy treat!

If you don’t like cold chicken salads, you can also do this as a hot one by nuking it for a few seconds after you’ve mixed everything together.

Here are some other great chicken salad options:

Nik's Angelic Eggs (featuring chicken salad)
Nik's Curried Chicken Salad

And stay tuned...later this week Jen is going to do a recipe remix with the buffalo chicken theme that will knock your socks off!

BF Family Style: Nik's Chicken Bacon Ranch Wrap


We've begun to post kid-friendly recipes, but not very many things geared toward the whole family.

My family is my kids and I, but I realize some of you have hungry spouses who want to eat well too. My kids and I used to be McDonald’s fanatics before surgery (I stopped being one when I read “Fast Food Nation,” the divas stopped by force…i.e. me). Nowadays, both budget and health concerns keep us from eating out much anymore.

I already posted my answer to the limited edition McDonald’s “Mac Wrap” and that’s a favorite in our family. Here’s another.

Nik’s Chicken Bacon Ranch Wrap

(this yields enough for at least two “you-sized” + three non-op sized individual portions)

Ingredients:

2-3 oz. grilled chicken bites (I use the Fit & Active brand from Aldi, Costco also has a brand called “Naked Nuggets” or you could just use 1 pound of chicken breast tenderloins cut into one-inch pieces)

8 slices of turkey bacon

1 c. Shredded cheddar cheese (1/4 c. for each wrap)

Four whole wheat wraps (I also use the Fit & Active which have the same stats as the more pricey Flatout wraps)

8 tbsp Light Ranch dressing (I used Fit & Active also but prefer Hidden Valley, 2 tbsp for each wrap)

Optional:

Shredded Lettuce
Tomato slices
Red onion slivers

Directions:

If you are making these from the pre-cooked grilled chicken nuggets, all you need to do is throw them in a sprayed pan to warm them through. If making from raw chicken, cook thoroughly and sprinkle both sides lightly with salt and pepper. If you have a grill pan, that works well.

While doing this, cook up your turkey bacon to your desired level of crispness.

Nuke the wrap for about 10 seconds just to make it more pliable then sprinkle the cheese over the entire wrap.

I got all wrapped up in this yummy dish! (/end corniness)

Add chicken, bacon and any garnishes you like and top with the ranch dressing.

Fold the top and bottom of your wrap then fold the sides over and slice in half.

Yummmmmmmm...
I served this to my youngest daughter with apple slices and peanut butter dip.

Nik’s Ridiculously Simple Peanut Butter Dip
2 heaping tbsp unflavored 0% Greek yogurt
2 tsp peanut flour (PB2 or Trader Joe’s brand)
2 packets of Splenda (or 1 tsp out of the bag)

Mix in a container and serve!

You could also serve this with a side of my zucchini fries. Just sayin...
This is a lunch I feel good about serving to my kids and you can feel good serving it to your family. Some notes: yes, you can use regular bacon if that is what your heart desires. For some freakish reason, both me and the divas like turkey bacon better. If you use pork bacon, I’d suggest, for convenience, using the pre-made kind and just nuking it to get it crispy.

Also, in these kinds of posts I often get questions about how much of this I can actually eat. I can eat about half a wrap with no garnishes on it. I usually opt to just make it for the divas and have a bite of theirs. I’m weird like that :)

Chicken Quinoa Vegetable Soup

~~posted by Jen
Quinoa and chicken and veggies, oh my!


Beef Barley soup was one of my "go to" recipes in my pre-op life when we were having people over on a Fall or Winter weekend. It was delicious and always a crowd pleaser, but I needed to change it a bit to fit my new post-op eating plan.

I traded in the higher carb barley for protein-packed quinoa, same texture but better for me, since it is a complete protein. I used chicken since I had some in the freezer left over from last week's Roast Chicken Dinner. You could also use a rotisserie chicken from the supermarket.

This is one of my "cheater" weeknight soups. You can have this from stove to table in less than a half hour. I took a little help from my pals at Trader Joe's with their frozen Quinoa with Roasted Vegetable Melange. I added some extra frozen mixed vegetables, just because I like lots of veggies in my soup.

Worried about breaking the no drinking with meals rule of the pouch when eating soup? If it's a broth-based soup like this one, I usually drink the broth first, then eat the rest of the soup ingredients. That way I am done drinking before I eat any solids, which is the whole point of that rule, so we don't stretch our stomas.

So here's how it's done:

Jen's Chicken Quinoa Vegetable Soup


Ingredients:


3 cups shredded or cubed roast chicken (or rotisserie chicken)
2 bags Trader Joe's Quinoa with vegetable melange 
OR 2 cups cooked Quinoa
1 (16 ounce) bag frozen mixed vegetables
4 cups chicken stock
1 tbsp Garlic powder
1 tbsp Onion powder
1 teaspoon Ground Cumin
1 (14 1/2 ounce) can diced tomatoes, including the juice
Salt and Pepper to taste
3 or 4 scoops Any Whey Unflavored Protein Powder (optional)

Directions: 

Cook the quinoa in your microwave or rice cooker according to package directions. While it cooks, pour the chicken stock and can of diced tomatoes (juice too) into your dutch oven and bring it to a boil on top of the stove. Add the mixed vegetables, garlic powder, onion powder, and cumin. Stir well to combine.

Once the quinoa is done, add it to the stock mixture on the stove and stir to combine. Let it simmer just until the vegetables are tender. Taste for seasonings, add salt, pepper, and any other spices it needs. If you're adding the protein powder, add it at the very end of cooking and whisk it in thoroughly.

If you're early out and on pureeds, you could puree this in your blender or with your immersion blender. This recipe is 143 grams of protein for the WHOLE POT of soup, so this is one you would most definitely want to consider adding the Any Whey Unflavored Protein Powder to at the end, or at least to your own personal serving. 1/2 scoop per 4 oz of soup is the usual amount we add. 


Related Posts Plugin for WordPress, Blogger...