Your Quest Bar orders help create more giveaways. Order today!

NEW! Working Search Button! USE IT!!!

Love BF as a blog? You'll love it even more as an e-mail newsletter. Get recipes, tips and more!

Shrimp & "Grits" A La Nik

Shrimp & Faux Grits
 
Now for those of you who are new, I’d like to let you in on an important piece of information (that you probably already know): when I put the name of food is “quotations,” it means it’s not really that food. So “rice” is not rice and, in this case, those “grits” are not grits. We all on the same page now? Lovely!

Over the summer, while the girls live with their dad, my boyfriend and I are culinary explorers. Here in the city of Baltimore there are ample opportunities for us to flex our wings, too. We have two events every year called “Restaurant Week” where fancy shmancy restaurants offer a special menu for a set price so that us gourmet-deprived masses may taste fine dining at least once in our lives (#sarcasm).

This year I really could only afford to do one restaurant during the week (which was the first week of August) and so I perused the Restaurant Week website to see what different places had on the menu and noticed a trend: grits are all the rage right now.

Now if you’ll indulge me a food memory, grits were a big part of my upbringing. We had them for breakfast countless times. My mom liked to crumble bacon over them and put the perfect amount of butter, salt and pepper. As an obese person, I added my own touch: a tablespoon of bacon drippings (along with the butter) and two fried eggs.

Nowadays I do eat grits sometimes but not in the quantity or the preparation that I used to. But still, it tickled me to see restaurants reimagining what amounts to the U.S. version of “peasant food.” (Meaning that it’s what most of us eat and not what most gourmets have traditionally cooked, NOT that we are all peasants!)

Fast forward to last night, when I needed a quick and tasty dinner. It was the divas first day of school and I’d worked all day. Generally I cook ahead but in prepping for school I didn’t get a chance to. This is when I start to look to my arsenal of 30-minute meal ideas. And I came back to that idea of dinner grits!

I’m going to give you two ways to do this. For those of you who eat grits in moderation, I will give you that method. For those who’d rather skip the grits (for whatever reason), I’ll give you “grits.” (See what I did there?)

Shrimp & Grits a la Nik
(Makes enough for three non-ops, one post-op with a post-op lunch portion left over!)
Ingredients:
  • 1 small onion, diced
  • 1 green pepper, diced
  • 1 non-green (yellow, red, orange – your choice!) pepper, diced
  • 1 clove garlic, minced
  • ½ lb. shrimp, tails removed (I used frozen cooked ones but rinsed them to get them thawed enough to remove the tails)
  • 1 tomato (variety of your choice), diced
  • Salt and pepper
  • 3 tbsp. tomato paste (or less if you want a more liquidy sauce)
  • 1 tsp. Cajun seasoning blend
  • 3 cups of spinach (or more, because I felt like it wasn’t enough)
  • A package of grits (quick or traditional, your choice – I’ll tell you what to do with it in the instructions)
  • Freshly grated parmesan cheese
Directions:

Spray a large skillet generously with non-stick cooking spray and set it over medium heat. Allow it to get HOT. Add onion and peppers and cook for 1-2 minutes, until slightly softened. Add garlic and stir.

Add shrimp and tomato and stir again. If shrimp are frozen, semi-frozen or cold, sprinkle some salt over the entire thing (not a bunch, it’s mostly to draw the water out of the veggies) and cover the pan and allow the shrimp to cook about 5 minutes or so. If shrimp are already fully cooked/room temperature, proceed to the next step.

Add tomato paste and seasoning and stir through. Add the spinach to the top of the mixture, cover and drop the heat to medium-low and allow it to simmer about 10 minutes or so. Uncover and mix the cooked spinach into the rest of the sauce.

While the sauce is simmering, cook the appropriate portion of grits, according to the amounts on the package directions EXCEPT instead of water, use milk (the fat percentage is up to you. I don’t give the family grits often so I just use whole milk when I do) and add a bit of salt and pepper to the milk as it is simmering. Once the grits have thickened, add 1 heaping tablespoon of Parmesan cheese for each intended serving of grits (so if you’re making 4 servings, use 4 tablespoons of Parmesan cheese).

Now if you're not into the idea of eating regular grits, this would be delicious atop my Four Cheese Mashed Cauliflower or...you can make “grits.”

Nik’s “Grits”

(Makes 2 -3 servings, depending on your eating capacity and who else you are feeding)

Ingredients:
  • 2 c. water
  • 3 c. of cauliflower florets
  • ¼ - 1/3 c. low-fat cream soup of your choice (nearly any flavor works. I used cream of mushroom)
  • ¼ c. freshly grated Parmesan cheese
  • 2-3 tbsp. milk
  • Salt and pepper, to taste
Directions:

In a pot, bring water to a boil and add cauliflower florets. Cook until very, very soft (about 10-12 minutes).

Drain and then mash (in whatever manner you see fit – I use a good old potato masher). You should mash it so that the cauliflower no longer looks like florets. If you still see florets, keep mashing! TIP: Drain the cauliflower into a colander and then mash in the colander in the sink. It helps to remove more of the water.

Mix in cream soup, cheese and milk. For thinner “grits” use more soup and milk. For thicker “grits” use less cream soup/milk. Mix thoroughly. 

Now just because I am a visual eater, I went at them with my immersion blender. But you certainly don’t have to do that. If you let them sit a moment, they thicken up and are very tasty. I will say though that they DO NOT feel like regular grits in your mouth. This is an alternative, not a replacement! J
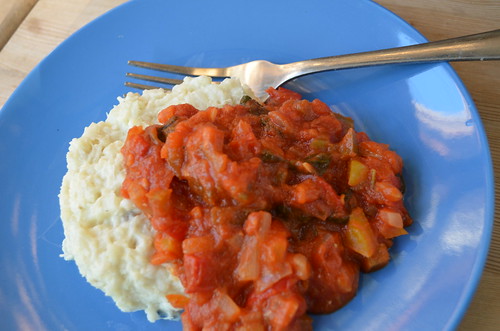
And of course here are an outtake of this meal (photo I did not choose for the cover shot)

Shrimp & Faux Grits
 
…and the boyfriend’s portion with regular grits


Julia's Thai Shrimp Skillet


Before we get to this yumminess, THANK YOU to everyone who pledged a goal for week one of the Bariatric Foodie Pledge! You can find the official week one pledge list (in alphabetical order) here. Remember that you must check-in on your goal at the end of the week to be eligible for this week’s prize, sponsored by Chike Nutrition. Week one check-ins open at 12 p.m. EST Saturday, February 8 and end 12 p.m. EST, Sunday February 9 (which is also when week two pledging begins).

If you’re going, “What the heck is a Bariatric Foodie Pledge?” click here.

Now…onto the yumminess. Chike Nutrition is, first and foremost, a maker of yummy protein powders. I’ve tried many and liked them (look out tomorrow for a comprehensive list of my favorites).


Recently, they came out with a new product: Chike PB. It’s peanut flour. What’s that? Well when a peanut is pressed for oil it leaves behind a powder, which contains most of the protein of the peanut and just a little bit of the fat. That’s peanut powder (also called peanut flour). It has about 85% less calories than peanut butter. Amazingly, Chike’s offering preserves 85% of the protein of a serving of peanut butter. Here’s how that shakes out.

Regular peanut butter (2 tbsp): 200 calories, 17g fat, 7g protein
Chike PB (2 tbsp): 45 calories, 1.5g fat, 6g protein

And when you mix it into things like protein shakes, protein oatmeal and desserts, it tastes like peanut butter! Sweet, right?

Anyhoo, I gave a Chike PB sample to a few fellow Foodies and asked them to think of interesting and new ways to use it. This comes by way of Julia, one of the finalists for the grand prize from last year’s Pledge, might I add!   

Julia’s Thai Shrimp Skillet

Ingredients:

Shrimp (or protein of choice)
  • 1 lb. shrimp, cooked (25 ct. size or so) OR a pound of your favorite protein, cut into pieces and cooked
  • Juice from one lime
  • Zest from one lime
  • 2 tbsp. fish sauce (if there’s an Asian section in your grocery store, check there. If not, you can omit)
  • 2 tbsp. peanut oil
  • 2 tsp. grated fresh ginger
  • 2-3 cloves of garlic, crushed 

Peanut Sauce
  • 6 oz. coconut milk
  • 5 tbsp. Chike PB powder
  • 1 tbsp lime Ponzu (again, check the international food aisle OR you can use soy sauce mixed with a squirt of lime juice)
  • 1 tbsp. fish sauce
  • 2 tbsp. Thai garlic chili sauce (this also tends to be in the international food aisle although it may be with other marinades – if you like spicy food, use the same amount of sriracha)
  • 2 tsp. grated fresh ginger
  • 2-3 cloves garlic, crushed 

The Veggies
  • ½ a sweet red pepper, cut in strips
  • ½ an orange sweet pepper, cut in strips
  • 1 medium onion, cut in strips
  • ½ a sweet potato, diced
  • 1/3 of an eggplant, diced
  • ½ - ¾ c. grape tomatoes, halved

Topping: fresh cilantro & roasted peanuts.

Directions:

Combine the marinade ingredients in a zip-top storage bag and add your protein. Marinate at least 30 minutes.

Place a skillet over medium-high heat and allow it to get hot, add peanut oil and sweet potato (add potato immediately as peanut oil begins to smoke very quickly). Stir about 3-4 minutes or until it starts to become tender then add the remaining vegetables and stir, sauteeing until the vegetables are as soft as you want them to be.

While your veggies are cooking, combine peanut sauce ingredients in a bowl and whisk (Julia used her Magic Bullet Blender). Make sure all peanut powder is incorporated and you don’t see any dry powder!

Drain your protein from the marinade liquid and add to the pan, along with the peanut sauce and stir until warmed through.

Serve warm with cilantro and peanut garnish!

"Why are you telling me all this, Nik? You're giving away the protein, not the PB!"

Good question! All will be revealed...TOMORROW! Bwahahahaha! (I've been dying to do an evil laugh. Indulge me, ok?)

Seriously. Check back to the blog tomorrow and you'll find out WHY I'm telling you about Chike PB. Because there's always a method to my madness.


From the BF Barbecue: Julia's Jerk Shrimp & Caribbean Quinoa Salad


This past weekend I held a BBQ for Baltimore-area Foodies. It was GREAT! My friend Margaret offered up her “ranch” (aka beautiful home near Frederick, MD) for the event and we all brought a WLS-friendly dish to enjoy.

The only thing that bugs me about doing live events is that BF has a readership across the U.S. (and, according to the Google, around the world) and there are many Foodies who simply cannot be there. And unfortunately I don’t have the resources to come to each and every one of you!

But I figure the least I can do is share the yumminess that comes out of the live events I do in hopes that you guys pick up a new recipe that you love. In the spirit of this, I am sharing as many recipes as I can from the BBQ.

First up is Julia’s Jerk Shrimp &Caribbean Quinoa Salad (for a quick tutorial on quinoa, click here). Julia is a Foodie but she’s also someone I correspond with locally through a coffee meet-up group I belong to. She’s been making this salad a while, mentioning it for a while. So I had to INSIST she bring this as her dish to pass at the BBQ.


It was YUMMY! Despite the name it was not “hot-spicy” but what I call “spice-ful” (meaning it has spices that don’t burn your tongue and you can taste those spices). It also had a sweet/savory combo flavor going on that I really liked!

Julia's Jerk Shrimp & Caribbean Quinoa Salad

Ingredients:
  • 1 cup dry quinoa
  • 2 cups chicken broth
  • 1-1/2 pounds shrimp, peeled & de-veined
  • 2-1/2 tablespoons jerk seasoning
  • 2 tablespoons extra virgin olive oil
  • 1/2 cup each, chopped: strawberries, green grapes, mandarin oranges, pineapple tidbits in juice (juice reserved)
  • 2 green onions, chopped
  • 2 tablespoons chopped cilantro
  • Caribbean vinaigrette: 3 tablespoons reserved pineapple juice, 3 tablespoons lemon juice (one lemon), 3 tablespoons extra virgin olive oil, jerk seasoning to taste
Directions:

Rinse quinoa under cold water (if package requires...some quinoa is pre-rinsed so you can skip this step). Combine chicken broth & quinoa in a pot. Bring to a boil, cover, turn heat to low and simmer for 15 minutes until broth is absorbed. Set aside to cool.

Pat shrimp dry and place in bowl or large Ziploc baggie. Add olive oil and jerk seasoning. Toss to coat and let it marinate for at least 30 minutes. Heat a large skillet over medium-high heat and cook shrimp until cooked through (about 2 minutes per side, depending on size of shrimp). May need to work in batches. Set shrimp aside.

Mix vinaigrette ingredients thoroughly. Combine chopped fruit, cooled quinoa and shrimp in a large bowl. Add dressing and stir to combine.

NOM! It was sooooo good I found myself wishing I'd taken some leftovers home. But alas. I guess I have to make some for myself. 

This recipe was brought to you by:


Julia, proud member of the Foodie Nation since 2011!

Selby's Jerk Shrimp & Quinoa


Every once in a while someone sends me a food picture that is just..."screen-lick-worthy."

Such is the case with Selby's Jerk Shrimp & Quinoa. I mean look at it. I know from VAST experience from island food that it has a kick to it (so proceed with caution if you don't do well with even slightly spicy foods). And the sauce looks luscious, the shrimp plump and succulent, the quinoa perfectly cooked. Sigh. 

Basically I wanted to reach through the computer screen and have a bite.

I'm posting this earlier than I normally would on a Saturday (the Google tells me that weekend posting should be done in the evening!) but I wanted to give you guys a chance to get the ingredients to create your own little island escape dinner if you wanted. 

Enjoy. And thanks Selby!

Selby's Jerk Shrimp & Quinoa
  • 1 c. quinoa 
  • 1 c. chicken broth (Selby used Goya chicken bouillon pack reconstituted with 1 c. of water)
  • 1 c. crushed pineapple juice from a can of crushed pineapple 
  • 10 shrimp
  • Jerk sauce mild or hot your choice 
  • 1 scallion sliced
  • Crushed pineapple, to taste
Selby's Instructions:

The recipe was really super easy the longest cook time was the quinoa . 

I rinsed 1 cup of quinoa really really good like 4 or five times. Rinsing removes the bitterness associated with quinoa . (Nik note: I don't rinse quinoa and never noticed any bitterness but if you have, go for it!)


I placed quinoa in microwave safe bowl and a added 1 cup of chicken stock, 1 cup  unsweetened pineapple juice from a can of crushed pineapples . 


Cover and microwave until liquid is absorbed. Mine took about 10 minutes (there was still a slight amount of liquid but it absorbed as it sat covered).  

Taste and adjust seasonings with garlic powder, onion powder, scallions, pepper, and some crushed pineapple .

The shrimp was super easy I peeled and deveined the shrimp and sautéed them in store bought jerk sauce. I sometimes add a little of the pineapple juice to the shrimp if the jerk is too spicy.  


Cook shrimp just until no longer pink . Plate with a serving of quinoa on the bottom and top with shrimp!

A few Nik Notes (in the spirit of playing with your food):
  • I am totally making this!!!
  • I'd probably add more veggies, colorful ones! I'd at least do some diced onions and tri-color diced peppers, chopped small and mix those directly into the quinoa before microwaving for a "confetti rice" sort of look.
  • Again, a disclaimer: you can certainly buy mild jerk sauce but jerk, by nature, is always going to be at least a bit spicy. 
There...now go make this!

Nik's Shrimp Faux Fried Rice


True fact: What you see above? I made in 20 minutes this morning while the kids were feeding the dog. And it will be my lunch probably for the entire week.

This is the story of how a simple bag of frozen cauliflower became so much more...

(By the way to all my Facebook Foodies, this is the take-out swap I've been talking about.)

Nik's Shrimp Faux Fried Rice
(Makes enough for 3-5 weekday meals depending on your eating capacity)

Ingredients:
  • About 1.5 c. of whatever veggies you have on hand, chopped small and COLD (in the above I chopped up some baby carrots, onions and threw in some shelled edamame for a bit more protein. When I say cold, I mean cold. They can even be frozen. Go for color variety!)
  • 1 bag frozen cauliflower florets (do not thaw!)
  • 1 small can baby shrimp, drained.
  • 2 eggs, beaten OR 1/2 c. Egg Beaters
  • 1 packet fried rice seasoning OR 1/2 tsp each: garlic powder & onion powder with 1/4 tsp. ground black pepper
  • 1/4 c. reduced sodium soy sauce

Directions:

I did this in a wok. I highly recommend you do too. Ikea. $7. Very cheap. BUT with a wok I have a piece of advice. Pre-chop before you start cooking. Woks cook very fast. We don't want any "incidents." That's all I'm saying about that. :)

Spray down your wok (or non-stick skillet if you don't have a wok) GENEROUSLY with  non-stick cooking spray. 

Once the wok is hot (the non-stick spray will start to emit a light amount of smoke),  throw in your cauliflower. If you listen to no other advice in this recipe, listen to this: DO NOT COOK THE CAULIFLOWER FIRST. USE FROZEN. ADD IT FROZEN. Why? This helps it stay firm. Even the above pic is a bit mushier than I wanted because I took too long cooking it.  You don't want fried rice soup!

Once the cauliflower is tender (takes about 4-ish minutes but play it by ear) you can mash it right in the wok with a potato masher to get a rice consistency. Mash the cauliflower as soon as you are able to do so...don't wait for it to get "soft."


Then throw in the rest of your veggies and your lil' baby shrimp and get them cooking (about 3 minutes or so). Be sure to mix the mashed cauliflower and veggies together.


Once that's done push everything aside a bit, spray down the empty space with more non-stick and add your egg. Scramble it before mixing it into the veggie mixture. (Admittedly the above is not the best photo but my wooden spoon is scrambling the egg while the other stuff is pushed to the side. So it can be done!)


Finally, add your seasonings (the above is what I used) along your soy sauce and stir that throughout your mixture. Then remove the wok from heat and immediately transfer the mixture to a bowl. 

If you couldn't tell already, this ENTIRE process goes quickly and is centered around NOT overcooking the cauliflower. Not to sound like a broken record, but pre-chopping and opening your ingredients is key. So long as you do that, the above should be no problem!

NOW...if you were a fried rice officianado in your former life, you will notice that while this TASTES like fried rice it does not have the same mouth-feel since cauliflower is softer than rice (my contention remains that this is a GOOD thing for us though...especially if you are new out and just trying solid foods).

It doesn't bug me. I'm more into the taste. Which is gooooooooood. Your mileage may vary. If you feel the softer cauliflower will ruin your memories of fried rice and scar you for life...consider skipping this one, k?

But if you have an open mind and tongue, this is a great swap for those nights when you are craving Chinese. 

Play with your food!

Alethea's Shrimp & Quinoa


Well, folks. It was bound to happen. With two kids in public school, some noxious germ was bound to find its way into my body. My immune system is fighting hard, though!

So while I am down for the count, I thought I'd share some Foodie submissions. I just love it when you guys email me with pictures and recipes about how you are playing with your food!

This week we have two offerings from the Foodie Nation. I'll post the second tomorrow!

Alethea's Shrimp & Quinoa

Here's the back-story she sent me:
Ok, so I set out to make shrimp and polenta from the Bobby Dean show, but it turns out polenta is not that popular in "po-dunk" Ohio so I had to make some adjustments. For the most part it was good but lacking a flavor punch (suggestions welcome, Foodies!). I am going to try it again. My youngest really liked it and he hates everything!
Ingredients:
  • 1/4 c. diced Canadian bacon
  • 2 to 3 cloves garlic, minced
  • 1 onion, diced
  • 1/2 green bell pepper, seeded and diced
  • One 14 1/2-ounce can petite-cut, no-salt diced tomatoes
  • 1/4 c. dry white wine
  • 2 tbsp. plain nonfat Greek-style yogurt
  • 1 tsp. hot sauce
  • 1/4 tsp. salt
  • 1 dozen large shrimp, peeled and deveined, with tails on
  • 3/4 c. uncooked quinoa
  • 3 cups hot water
  • 1 tablespoon chopped fresh chives, for garnish, optional
Directions:


Add the bacon to a nonstick skillet and saute over medium heat until crisp. Transfer the bacon to a plate and set aside. Add the garlic, onions and bell peppers. Cook, stirring occasionally, until the vegetables are tender, about 8 minutes.


Add the tomatoes, wine, yogurt, hot sauce and salt, and bring to a boil, stirring constantly to scrape the browned bits from the bottom of the pan. Reduce the heat and simmer, uncovered, until the flavors are blended and the sauce begins to thicken, 6 to 8 minutes. Return the bacon to the skillet. Add the shrimp and cook until the shrimp turn bright pink and are cooked through, 1 to 2 minutes.


Meanwhile, in a heavy cast-iron skillet, add your quinoa and allow it to toast for about a minute. Add the hot water and slowly whisk the quinoa and water together. Reduce the heat and simmer about 7-10 minutes, or until the quinoa is fully cooked (Click here for an easy primer on quinoa!). Remove from the heat., 

Serve the shrimp mixture over the quinoa. Sprinkle with the chives if desired.

Nik's Notes:

Alethea noted that it needed a flavor punch. Here are several ways to do that:
  • 1/4 tsp. red pepper flakes, while toasting the quinoa if you like a spicy kick
  • Play around with the kind of bacon you use. You can use a sweeter smoked bacon if you want a slightly sweet off-set or a smoked bacon. Also, I'd use center-cut bacon. Less fat, more meaty flavor!
  • Instead of bacon, try dicing up some turkey smoked sausages and following the recipe the same way
  • If sodium isn't an issue, try a can of pre-flavored diced tomatoes. They come in such variations as tomatoes and chiles (in mild, medium or hot), Italian-style and garlic and herb
How would YOU make this dish your own, Foodies?


Related Posts Plugin for WordPress, Blogger...