Your Quest Bar orders help create more giveaways. Order today!

NEW! Working Search Button! USE IT!!!

Love BF as a blog? You'll love it even more as an e-mail newsletter. Get recipes, tips and more!

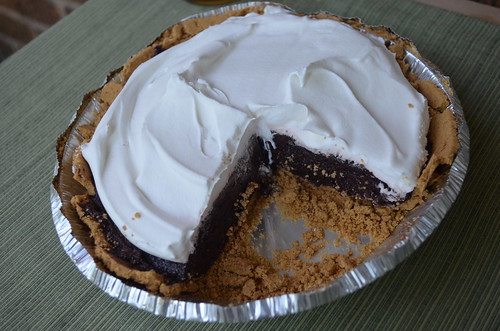
S'mores Protein Pudding Pie

S'mores Protein Pie featuring CLICK 
Even though we've been experiencing fall-like weather in Baltimore over the past week it is still, in fact, summer. Which means my gut instinct is to NOT turn on the oven if I can avoid it. I have one big cooking day a week where I make or "start" a bunch of things and then finish them off throughout the week (Dear Rachel: I had the idea first!)

So once the Cheesy Chicken & Broccoli Bake and a batch of my Curried Chicken were all squared away, it was time to think about dessert. Now dessert is mainly a notion for my family. Even at six years post-op, anything more than a bite of something sweet directly after a meal is not happening.

For me, like so many other post-ops, dessert is another meal entirely. That's part of what makes it problematic for me. I love protein shakes and I've made all manner of desserts (especially cheesecakes!) weight loss surgery friendly, but here's a true fact: Nik cannot stand too much sweet stuff! Nope, I can't. A few bites and I'm good to go. This makes it imperative that I make things my children (and now, my boyfriend) also like. Because there's no way in hell I'm finishing a dessert by myself, short of being able to freeze it.

ANYWHO.  Protein Pudding is often a favorite dessert of mine but I decided I'd like a protein pudding pie. Since the children are still gone for the summer, I rightfully should have made these in ramekins but...I didn't. What can I say? I don't always have a good explanation for why I do the things that I do!

Nik's S'mores Protein Pudding Pie
(This yields a family-sized or share-able pie. If you'd like smaller portions, this also makes about 8 ramekins worth of pie, which can be frozen for up to two months, if wrapped properly.)

Ingredients:
  • 2 (1 oz.) boxes sugar-free chocolate pudding mix
  • 3 scoops (doesn't matter the size of the scoop) unflavored protein powder (NOTE: I highly suggest an unflavored protein powder, like BiPro USA, but you can use either a vanilla or chocolate based protein powder. But your pie will be SWEEEEEEEET.)
  • 1 tbsp. unsweetened cocoa powder
  • 2 -1/4 c. milk (NOTE:  must be cow's milk. Traditional pudding mix won't set up with almond or soy milk)
  • 1/4 c. Torani Sugar-free S'mores flavored syrup
  • 1 tub (8 oz.) whipped topping (low-fat, fat-free, your choice)
  • 1 crumb pie crust (you can either do a Fiber One/high protein or fiber cereal crust OR you can do what I did and splurge on a pre-made graham cracker crust...it truly was a lazy evening!)
Directions:

In a bowl, whisk together pudding mix, protein powder and cocoa powder until thoroughly combined.

Add milk and syrup and blend whatever way you see fit (that particular evening I didn't feel like breaking out the mixer so I just whisked by hand). The mixture will be thick and it may appear slightly gritty. If so, add a bit more milk (try adding 2 tbsp. at a time) until it gets better. In my experience, protein pudding is always at least slightly gritty. And did I mention the mixture would be THICK?

Spread the mixture in your pie crust evenly. It should only come about 3/4 of the way up the crust. Then top with whipped topping. Cover it (that's where the premade crust comes in handy as it has a plastic dome top) and refrigerate an hour before serving.

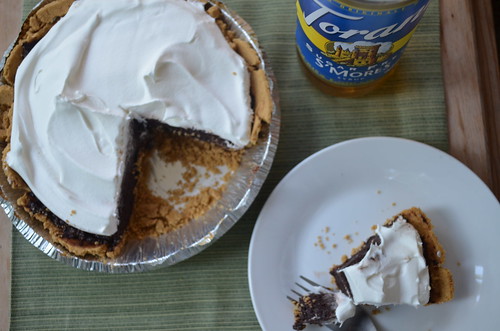
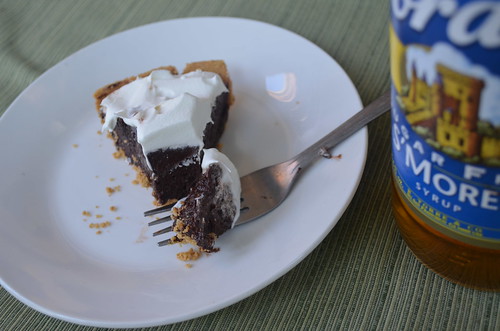
As is quickly becoming my new custom, here are a few more shots I took of the pie, for your viewing pleasure!
S'mores Protein Pie featuring CLICK
Just a little slice is all you need!


S'mores Protein Pie featuring CLICK
So I had a mishap with the crust. It sort of broke up on me. Doesn't affect the taste one bit!


For more yummy, protein-packed ideas, check out The Bariatric Foodie Guide to Perfect Protein Shakes, available in hardcopy and Kindle eBook on Amazon, as well as on Smashwords for iPad and Nook. The book not only gives you ideas for great shakes, but teaches you how to make other protein treats like protein ice cream and protein pudding (which is the base of this pie!). 


Tilapia Verde


I'm literally eating this as I type. I don't routinely upload recipes this quickly after sharing them (read: don't go getting spoiled) but I figured since it's a quiet day and I have the time, why not?

This dish started with me having a random assortment of vegetable-type stuff to use up. A few days ago I sacrificed two zucchinis and an eggplant to my co-worker's compost pile. While I'm glad they will still get good use, that hurt my heart!

Now I feel especially passionate about using up my veggies since I read this statistic in Women's Health Magazine. 

I also needed something quick to prepare. On Tuesdays and Thursdays I go to a 5:45 a.m. weight lifting class which lasts an hour. In order to get the divas to school on time I must leave by 7:20 a.m. So, this morning (having not prepped anything for today) I had to get back from the gym from a class that ends at 6:45, get un-grossified, dressed, make sure they are un-grossified and dressed, and get us all out the door in 35 minutes. Oh...and make lunch. 

So this is to say if I could pull off that feat with a great lunch, I have confidence in the rest of you!

Nik's Tilapia Verde
(Makes numerous servings. For me, two, for you, who knows?)
  • 1/4 c. water
  • 1/2 a small onion, cut into slivers
  • 2 c. spinach
  • 2 tsp. garlic, minced (luckily I don't kiss anyone during my workday!)
  • 1/2 a yellow squash, cut into rounds, then halved
  • 2 - 4 oz. tilapia filets
  • 1 c. salsa verde (mine was homemade...I'd imagine pesto would work well too in this situation to keep the whole "verde" theme although pesto something of a caloric bomb with all the oil...tasty but very caloric!)
  • Salt, pepper to taste
Directions:

Set a nonstick skillet over medium heat and add water. On top of it add all the veggies and garlic. Top with fish and sauce. Cover.

Go get un-grossified and dressed. Return to kitchen and check on it. At this point it should be REALLY watery. Remove the cover and go back upstairs. Do your hair, make-up, yell at your pre-teenager to hurry up, relent to fixing the hair of your teenager ("Because it never comes out right unless you do it, Mom!). Get dog and cat situated then return to the kitchen. (Yes, this is ALL a part of the recipe! Men, you do this too!)

Remove from heat while you get your purse/briefcase/smart technology together. Empty contents of skillet into a plastic container, snap the lid on and get to gittin'! 

SIDE NOTE:

Did I mention La Grande Diva turned 15 on Tuesday? I baked her the cutest cake. I hope you don't find me mean cruel or some other horrible adjective for sharing it with you. It's called an Ombre Coconut Cake (Ombre being a style of dyeing things where you use one color and go from darkest to lightest hues). I got the recipe/method from Food Network Magazine. I posted the pic on their Facebook Page and it's getting lotsa love. It's a HUGE cake. I could only eat a few bites. I'm not a big sweets person. I've not touched it since then. 


So...in summary...I had time to make that fabulously healthy lunch up above AND this beautimous cake (which I made from scratch, by the way). I am Nik, hear me ROAR!

Nikki's Clicky Mousse


Hey! Remember me? I post food sometimes!

Foodies, indulge me a personal reflection moment. I am of the school of thought that self-care is very important and that there are aspects of your feelings and motivations that you should listen to and heed. So when you see that I haven't been posting for a while that usually means I've burned myself out. I live a pretty full life between being a single mom to the divas, my day job, this blog and the million and two things I sign up for. So every once in a while I just stop. And it's good for me because it allows me to be enthusiastic about the time when I go!

Anyway, back to the grind.

This is one of those recipes I THOUGHT I already had on the blog, came on to double check an ingredient and found that it was not!

You don't know how much I wanted to call this "Clicky pudding" (so I could sing about it to the tune of "We Wish You a Merry Christmas") but honestly the texture is of a mousse. Specifically, if you've ever had Jell-O Mousse Temptations. THAT texture. Lookit:


And here's my recipe!

Nikki's Clicky Mousse
(Makes approximately 6 servings)

Ingredients:
  • 1 box sugar-free, fat-free chocolate pudding mix
  • 2-3 scoops Click Espresso Protein, Mocha flavor (the more you put in, the more "mousse-y" it is). You can use regular Mocha or Mocha Decaf, doesn't matter.
  • 1 tbsp. unsweetened cocoa powder (just makes for a deeper chocolate taste)
  • 2 additional packets of no-calorie sweetener (balances out the bitter that is created by the extra cocoa + the espresso)
  • 2 c. milk (I use skim)
Directions:

In a large mixing bowl, whisk together pudding mix, Click, cocoa powder and sweetener until well blended.

Add milk. Now, you can either whisk it (although this is going to get difficult after a point because the protein in the click "tightens" the mixture up a good bit) OR you can do what I do and go at it on medium speed with a hand mixer. Much smoother final product!

For fun you can add other things you like: Sugar-free syrups (hazelnut goes especially well in this one). As you can see I top mine with lowfat whipped cream. Usually I put a dusting of Fiber One crumbs (yes, I love the stuff that much!). Right now I am absolutely in love with eating desserts out of stemless wine glasses.

The protein in the Click increases the volume of the pudding, which is why I say it makes about 6 servings, but it really depends on your appetite. It could be more, could be less.

Either way it's yummy so enjoy!!!

Bacon Cheeseburger Skillet


I tell you, I’ve been looking for ways to reinvent the cheeseburger since I had surgery. Why? Cheeseburgers shut me down QUICK. A few bites and I feel icky. I don’t know what it is. And it isn’t limited to burgers. Meatballs and meatloaves get the same treatment, no matter what I make them out of.


Well lately I’ve been missing bacon cheeseburgers in particular. Back in the day…WOO! I was a Big Bacon Classic girl. You know, the monstrocity from Wendy’s. Yep. Large Fry, large chocolate Frosty baby!

But we’re living life a little differently now. Sigh.

Some of you might remember the wonder that was cheeseburger soup. That’s nice, but this is June in Baltimore and I don’t have central AC, so soup is sorta persona non grata around my house.

So I invented this skillet meal to kill two birds with one stone. Back in the day the divas used to be big into Hamburger Helper. So I figured a skillet cheeseburger meal would satisfy us all.

Nik’s Bacon Cheeseburger Skillet

Ingredients

1 small onion, diced
1 clove garlic, minced
1 lb. lean ground meat (I used turkey)
1 tbsp liquid smoke (optional but it helps)
1 can diced tomatoes (or tomatoes & chiles as I used)
1 tbsp tomato paste
4 c. cooked cauliflower florets
1 c. water
2 c. whatever shredded cheddar cheese you have on hand
½ c. milk (I used skim)
Salt, pepper, onion powder to taste
4 strips of bacon (I used the pre-cooked kind and nuked it for 30 seconds in the microwave), chopped

Directions

Spray down a pan and sautee your onion and garlic until tender over medium heat.

In a bowl, mix meat and liquid smoke thoroughly then add it to the pan with the cooked onions/garlic and brown thoroughly.

Add tomatoes and tomato paste and mix well . Add water and cauliflower florets. Bring to a boil and then reduce heat and allow mixture to simmer about 3 minutes.

Add cheese, then milk and stir. Cheese will seem stringy for a while, but will eventually melt. Keep stirring until it does.

Cut bacon into bits and add to the mixture, stirring well.

Simmer on low heat a few minutes more then turn off heat. “Sauce” will thicken upon standing.

The first portion I ate of this (for dinner), I ate straight up. The second (lunch the next day) I put a dollop of leftover “Everything Sauce” on. Either way…YUMMY!

And if you have some leftover cauliflower hanging around, here are some other cool things you can do with it:

Nik's Protein Popsicles - Strawberry Banana


It’s summertime!!!

Well, maybe not. But it’s hot. It’s hot where I am and, more than likely, hot where you are too (if my weatherman is honest at all).

Raise your hand if you’ve already started buying sugar free popsicles in bulk from Costco for your deep freezer. Yeah, I thought so.

Those things are a delicious and low-cal way to satisfy your sweet tooth and you won’t hear anything negative about them from me. However, I do have another option to throw in the ring.

Do you have trouble getting your daily protein? Do you like frozen fruit bars, fudgesicles and the like? Well have I got something for you!

This is the first of many recipes that I’ll share over the summer for these. Like protein shakes, the possibilities are endless!

Nik’s Strawberry-Banana Protein Pops

Ingredients:

2 c. milk (I use skim)
1 box sugar-free banana cream pudding mix
2 scoops vanilla protein powder
1 c. frozen strawberries

Directions:

This is an easy three step process. While I use my bullet here (and you’ll see from the picture that it was too small to handle this job) I recommend using a traditional blender for this.


Step One: In your blender, combine milk, pudding mix and protein powder. Blend about a minute or until thoroughly mixed. Add in strawberries (if the mixture has thickened too much, add in about an ounce of water to help it along) and blend again until strawberries are distributed throughout. It’s ok if there’s small berry chunks in there (so long as you don’t mind it).


Step Two: Carefully pour your mixture into popsicle molds. I use molds that make four popsicles. The size of your molds determines how many pops this recipe yields, which is why I didn’t say how many above.
Step Three: Freeze for at least two hours. When you’re ready to have a pop, you may have to run your mold under the water tap (room temperature water) to release it from the mold.

Like I said, you really are limited only to your own imagination with these things. You can use any combination of pudding, protein flavor and fruit to make whatever flavor YOU like.

I will say this one is yummy. I chose to use banana pudding instead of actual bananas to limit the carbs. If you’re potassium deficient, feeding the kiddos or just dig real bananas, hey, I don’t micromanage your pouch! I’m just here to spread the love.

Want more protein pop ideas? Check out the Bariatric Foodie Guide to Perfect Protein Shakes (available on Amazon). It's got dozens of flavor ideas that can be made into protein pops, shakes, frozen treats and more!

Nik's Fiesta Chicken and "Rice" Skillet


Cinqo de Mayo is almost here and I promised you some fun recipes. This is one. The other is a dessert (the divas finally finished off the last of the Easter treats...woot!) which I'll share probably tomorrow (but it's quick and easy enough that I reserve the right to post it on Thursday).

Tonight's offering can be a one skillet dinner if you happen to have some cauliflower rice hanging around (and by the way, yes you can freeze cauliflower rice). If not, one skillet, one pot but still very quick and easy!

Nik's Fiesta Chicken and "Rice" Skillet

Ingredients

1 lb. chicken breasts, cooked and cubed
1 bag cauliflower florets, cooked and mashed (or 2 c. cauliflower rice)
1 small onion, finely diced
1 green pepper, finely diced
2 cans tomatoes and chiles (whatever heat intensity you like)
1 can black beans
1 can cheddar cheese soup
2 tbsp tomato paste (if you don't have it you can skip this but it does add zip)
1 tsp minced garlic
1/4 tsp each ground coriander and ground cumin

Directions

Spray down a skillet with nonstick and throw in your onions and peppers. Sautee until softened then add garlic and spices and mix well.

Add tomatoes and chiles, tomato paste and chicken cubes and allow to simmer until the liquid is reduced by about half. (Maybe 5 minutes or so)

Add in your drained black beans (don't forget to rinse them when you drain them from the can to get that extra sodium off!) and cauliflower rice. Stir well. At this point you have a big ass skillet of food. I probably should have mentioned this earlier but...use a big skillet!

Finally, add in cheese soup and stir well. Allow mixture to simmer on low-medium heat for about ten minutes or until warmed through. Serve hot!


Now this is one of those dishes that will make your kids heads explode. Because they won't want to like it. It's got all the makings of something they'll absolutely hate...until they taste it and love it.

You may very well ruin them for junk food forever...you bad parent you!

No-bake Protein Key Lime Pie


OMG. Have you ever had the forces of nature conspiring against you? No? Well don't ever. It's no fun.

There are many, many reasons I haven't posted since last Friday but none are thrilling enough to detail here so I'll just say two things. I'm sorry! And...I missed you guys!

Moving on...

Have you guys checked out my homegirl Michelle's (aka "Eggface") blog? Most of you have, I suspect and if you have you've seen she makes this wonderful "fluff stuff."

Well about two weeks ago I finally broke down and made some and yowsa, is that stuff good! But being the food freakonomist I am, I wanted to play around with it. As I thought about it, I realized our dear Eggface had shown me the way to no bake protein cooking. And so this experiment began.

Nik's No-bake Protein Key Lime Pie

Three disclaimers on this one:

#1 - I really do recommend doing a crumb crust of some sort with this. If you do it crustless, do it in ramekins at least.

#2 - The forces of nature that conspired against me are also the reason I don't have a picture of the third, and final, test of this recipe wherein I DID make a crumb crust. I will add as soon as I am able!

#3 - YES, I know the "key" in key lime means something...but I'm from Maryland...work with me here...

Ingredients:

12 oz. unflavored Greek yogurt (whatever fat percentage you use)
8 oz. Neufchatel Cheese (1/3 less fat cream cheese)
1 box sugar-free lime Jell-O
1 tsp lime juice
1/2 tsp Splenda
3 scoops unfavored protein (I like BiPro USA)
1 c. boiling water
1/2 c. cold water

For Crust: click here

Directions:

Follow instructions on making the crust and allow it to cool.

In a bowl, combine cream cheese, Greek yogurt, protein powder. lime juice and Splenda until smooth. Yes, it can be achieved, lookit:


Prepare Jell-O according to package directions in another bowl. TIP: If you ever misplace your half cup measure (as I often do even though I own several of them), you can also use 4 ice cubes. 1 ice cube = 1 oz. water.


Pour Jell-O into yogurt, cream cheese mixture and gently fold in (in the example above I used a hand mixer which created WAY too much air. Not much difference from a flavor perspective but I'm kind of anal about my food looking perfect) until completely mixed.

Pour that mixture into the crust and refrigerate about an hour, or until fully set.

The results...

I really like this pie. It only took a few minutes to put together and the kids LOVED it. I wish I had the picture I took of the crusted pie. Hmph. Damn camera!

And because I am becoming the MOST eggregious violator of my own "no stats" rule, I will tell you that MY pie, without the crust came out to (per slice) 105 calories, 12.62g of protein. Don't ask me for the rest of the stats...I am seriously recovering from "kick Nik while she's down-itis..."

Until tomorrow my lovelies...(hopefully)

Crab & Asiago Egg Casserole


Word to the wise, peeps. Take a look at what's going on in the veggie bin of your fridge. Sometimes you bought something knowing you'd cook it and love it only to find it months later, rotten, watery and smelly. But look on the bright side. At least you helped your kid get a jump on their science project, right?

I already had this casserole in my head (had since I ran out of Mexican Egg Casserole) and was about to go and buy even MORE veggies when I decided to just take a peek in my bin. HOLY COW! There was a lot of veggies in there that were "on their way home" but nooooot quite there yet. So I diced them up and threw them in here. That's the beauty of a casserole. You can put nearly anything in it.

Nik's Crab & Asiago Egg Casserole
(Feeds about six non-ops, makes probably about 9-10 post-op portions. If you can't eat much, slice, wrap and freeze!)


Ingredients

1 large can of crabmeat (I forgot to look how many ounces the one I used was, but it was roughly three times the size of a can of tuna)
1 small onion, diced
1 large tomato, diced
1 small green pepper, finely diced
6 eggs, beaten (or equivalent amount of liquid egg substitute)
1 cup shredded asiago cheese
1/2 cup shredded part-skim mozzarella
1/2 cup shredded parmesan cheese
salt and pepper, to taste

Directions

Empty crab meat into a large bowl and pick out any random shells.


Add veggies and cheese and mix thoroughly before folding in your egg.

Transfer to a 13 x 9 casserole dish and bake at 350 for about 30 minutes.

(Easy, right?)


As it is cooling you can sprinkle a bit more parmesan on top. It gives the top a nice crunch that you'd ordinarily get from bread crumbs.

The above picture, I should say, is totally for show. What I ended up doing with it was this. I ate 3/4 of that slice of casserole, distributed the other 1/4 between two kitties-who-shall-not-be-named (cough...Niobe and Socks!) who wouldn't leave me alone once they smelled crab. I did have the little green salad on the side and that is one slice of turkey bacon cut in three and I had that too.

I can already tell I am going to be freezing pieces of this one. It, like its Mexican cousin, is hearty! Good thing I now have one of these to make sure it stays safe in my freezer! I recently got one and it's been a godsend!

Now...if you'll excuse me...I'm off to see what adventures await me in my fruit bin!

Four Cheese Mashed Cauliflower

(Programming Note: If you like this, or any other BF recipe, an easy way to let me know - so I can keep more recipes like it coming - is by clicking one of the "reaction" boxes at the end of the post!)

You ever clean out your refrigerator and find small blocks of random cheese (that's still good) that you forgot you had? Or is that just me?

That happened to me the other day. Here's what I did with it.


Nik's Four Cheese Mashed Cauliflower

Ingredients

1 large head cauliflower, cut into florets (or two bags frozen florets)
2-4 oz. of three different kinds of cheese (So 6-8 oz. cheese total. You're using a few ounces of each KIND of cheese. I used leftover asiago, monterey jack and sharp cheddar)
1 egg, beaten
6 oz. container Greek yogurt
2 tablespoons light butter spread (I used Blue Bonnet Light), melted
1/4 c. whole wheat bread crumbs (NOTE: Since I first made this recipe I have started nixing the bread crumbs and just letting the cheese brown on top. Even less carbs this way!)
1/2 c. grated Parmesan cheese
Dashes of: onion powder, garlic powder, salt and pepper and paprika

Directions

Boil cauliflower florets until tender, drain and mash (see here for good directions on doing that).

Mix in cheeses, yogurt and whatever spices you like, except the paprika (keep the cauliflower in the pot when you do this). Stir thoroughly then mix in the egg.

Transfer mixture over to a 13 x 9 casserole dish.

In a small bowl, combine bread crumbs, Parmesan cheese and "butter."

Spread evenly over cauliflower mixture and top with a dash or two of paprika.

Bake at 350 for about 20 minutes or until top is nicely browned.

And for those wondering, "will kids really eat this stuff?" I offer the following evidence. The photo above was taken straight out of the oven. Check out the state of the dish not five minutes after that (and I had not yet had a portion).


Need I say more? But if you want to sell them even more on the idea of cheesy mashed cauliflower, check out my uber-cute cheesy mashed cauliflower cups.


Mexican Egg Casserole


I just want to clear up one thing first. I have no idea if there is really such a thing as Mexican Egg Casserole. That's just the best name I could come up with for what this is.

It is not a quiche. Not even a crustless one. Quiche implies a lightness this thing does not possess. No...this boy is hearty! He's also not necessarily breakfast, in my opinion. This guy could stand up against any other good dinner choice, alongside a nice salad and (for the fam) a roll.

Nik's Mexican Egg Casserole

Ingredients

1 small onion, finely diced
1 small green pepper, finely diced
1 can tomatoes & chiles (get mild if you don't like spicy food)
1 log of chorizo sausage (get mild if you don't like spicy food)
1 can of beans (I used the kidneys I had left from my red beans & rice, but black beans are nice also), drained and rinsed
1 c. + 1/4 c. shredded Mexican blend cheese
1/2 c. milk
6 eggs (or the equivalent amount of liquid egg substitute)
A dash each: salt, pepper, cajun seasoning blend

For those who do like spicy food:

2 serrano peppers, finely diced, seeds included
A dash of cayenne pepper

Directions:

Spray a skillet with nonstick and toss in your onions, green peppers and serranos. Let them cook until tender.

Cut your chorizo out of the casing and add to pan. Brown it as you would ground beef. Add tomatoes and chiles and warm through.

In a large bowl, beat your six eggs with your milk and add any seasonings you like. Add 1 cup of cheese and beat again.

Spread meat/veggie mixture out in a casserole dish.


Pour egg mixture on top and gently fold.


Bake at 350 for about 30 minutes or until completely set. Sprinkle additional cheese on top and allow it to melt as the casserole cools.


This is one I get all to myself. The divas share their father's complete and total hatred of eggs. I don't get that but whatever. It's rare I get ANYTHING to myself, so I'm not complaining! But this dish did get two enthusiastic thumbs up from the guests at Dr. Singh's Mexican Pouch Party who got to sample it!

Want more fun with eggs? Check out these BF recipes:
<< Yesterday's Post: Nik's Salty Caramel Dessert

Nik's Crockpot Pork Barbecue


Warning: People who are really into barbecue (and you know who you are), to you this recipe might seem like blasphemy. Or heresy. Or something else really bad ending in a “y.” But this is the “single mom who wants some bbq too” method. You want to spend hours cooking meat…be my guest.

So barbecue. I love it. Love, love, love! What I do not love is all the steps in making traditional barbecue. So when I have a hankering for some nice barbecue pork, I make this. The divas like it on a bun. I have taken to making my own KFC-style bowl with whatever veggies I’m serving (this night it was a bit of corn, tomato and okra) and just going to town with that. Either way, this stuff is yummy and ridiculously easy to make.

Nik’s Easy Pork Barbecue

1 package country ribs (if you want to go to the trouble of trimming the fat, be my guest, I don’t usually since I don’t eat this too, too often)
4 cups water
1 small onion, sliced
1 tsp each seasoned salt, garlic powder, and onion powder
1 bottle of whatever BBQ sauce you like

Directions:

Place ribs in a slow cooker with onions, seasonings and water.

Turn slow cooker on.

Walk away for four hours or so.

Come back. (see it's also a very active recipe...;)


Drain about 85% of the excess water (in a colander so you don’t accidentally dump any of your meat) and pull apart meat with a fork until it is in shreds.

Add BBQ sauce and cook an additional 20 minutes or so.

Serve however you see fit.

This goes well with my low(er) carb cornbread (so long as you aren’t doing sandwiches). In fact, that might be my next ramekin creation.

Until then, keep playing with your food!

Nik's Queso Chicken

Ok, so I realize since I've been stepping my photography game up lately that this picture COULD have been better. But it was taken at work. Cut me some slack!!!


You ever go to make something you REALLY want, reasonably sure you have all the ingredients, then you go to finish it and you find that you really don't?

Nah...that doesn't happen to you guys. Because, unlike me, you have the good sense to check first!!!

I decided to make some Southwest Chicken for my lunches this week. I was soooo excited. I love that stuff! It's the simplest thing in the world to make (click the link for the original recipe). But when it came down to it, I was missing the one, pivotal ingredient...cream cheese! That's highly unusual by the way. I am NEVER out of cream cheese.

So anyway...I had to edit my plan. Here's what I came up with.

Nik's Queso Chicken

Ingredients

1 lb. boneless, skinless chicken breasts (mine were frozen but you can also use fresh)
1 jar of medium salsa (I imagine my beloved TJ's chipotle salsa would work well too)
1 can of black beans, drained
1 can of Campbell's cheese soup

Directions:

(Best done in the morning) Place the chicken in your crockpot and cover with salsa. Turn your crockpot on low and go to work...or wherever you go during the day.

When you get home, drain your beans and throw them in there, along with the can of cheese soup. Stir and allow to cook another 30 minutes or so. (NOTE: After emptying out my fridge to make sure that I REALLY had NO cream cheese--because it really is a rare event--I forgot to add my black beans! So basically, I was a hot mess in that moment. But trust that they taste good in there).

My kids liked both the original and this version with crushed tortilla chips on top (I use TJ's spicy flaxseed soy nachos).


This is a nice lunch to take you away from the craziness of your busy day...but not too far...the world might end or something.

I would call this a serendipitous moment...but it wasn't nearly that coordinated! PWYF peeps!

Nik's "Lil Baby" Pot Pies

~by Nikki

The pies go marching one by one...hurrah...hurrah...


Raise your hand if you, like me, used to love it when your mom was too busy to cook dinner and handed you off one of those little pot pies that you cook in the oven? The only problem for me with that little pie…and I mean the ONLY problem…was that those lil’ things took forever to cook!

But how I loved them! On a particularly long day my mom would throw one in the oven and when it was done she’d serve it to me with a glass of red (yes red…not cherry…not “tropical punch” but red…) Kool-Aid and trudge off after some headache medicine.

I have fond memories of these little pies, partly because they are the perfect package of comfort food and partly because I knew once my mom fell asleep I could stay up late and watch whatever I wanted.

So anyway, here we are post-WLS. And while pot pies are not THE most egregious thing I could eat, I feel like there’s room for improvement here. Besides…anything with a crust almost ensures I can’t eat a whole portion of it. So here’s what I came up with.

Nik’s “Lil’ Baby” Pot Pies

Ingredients:

Crust (makes more than you need but freezes well):

1 c. Carbquik
¼ tsp salt
1 stick of reduced calorie baking spread or butter (I used Blue Bonnet Light), chilled and cubed
Ice cold water (get 1 cup but you won’t use it all)

Optional (but it made it oh so much better for me): a dash of garlic powder and ¼ c. shredded cheddar cheese

Note: Some folks have asked me if it's ok to sub Atkins Baking Mix for Carbquik. Absolutely! The Atkins Mix works just fine with the exact same measurements. The Carbquik is just my personal preference in this recipe!

Filling:

1 large chicken breast filet, cooked and shredded (or you can use a can of chicken breast meat)
1 can of mixed vegetables, drained and rinsed
1 can of light cream of chicken soup (I used Fit & Active)
¼ - ½ c. skim milk

Optional: a few scoops of Any Whey unflavored protein powder(how much depends on how many pot pies you make...see below)

Equipment: If you're looking to use all your filling, you'll need either, eight 2 oz. ramekins, six 4 ounce ramekins. Or you might also invest in larger ones(8 oz.) for the fam (in which case, depending on the size of your family, you might double both the crust and filling recipe!

Directions:

Making the Crust

I know what you're thinking. "Nik, you want us to make frickin' pie crust???" Just breathe...this is so ridiculously simple that you won't believe it. First off, you'd do this the night before you want to make the pot pies. And there's only four easy steps.

Step One: Combine the Carbquik, salt and any other seasonings.

Your flour should look something like this when you cut your butter in.

Step Two: Cut in the butter. It is IMPORTANT that the butter be cold. I usually freeze my stick of butter  and cut it into cubes. I use a biscuit cutter but you can also use a food processor. Mix the flour mixture and butter until it is the consistency of small peas (although mine look more like dandruff...just sayin..)


Step Three: Add cold water (again, the cold is important), tablespoon by tablespoon until you are able to get the mixture into a dough ball. For me, this took about 4 tablespoons of water, but it really does depend on a lot of factors INCLUDING the humidity where you are.

Step Four: Wrap your little dough ball in plastic wrap and refrigerate until you are ready to put it all together.

Making the Filling

This is the about the easiest pot pie filling you'll ever find. Four ingredients people! (milk not shown below)


To make the filling you’d combine your chicken, veggies and soup in a sauce pan.


Finished filling...yummmmmmmmy...

Then add as much milk as you need to just slightly thin it out. Bring to a boil and then remove from heat. Add protein powder after removing from heat and make sure it is thoroughly mixed in.


Cut your dough ball in half (it takes half the dough ball to make the crusts for four pies). Using a rolling pin, roll your dough out to the desired thickness. Use the appropriate size biscuit cutter to form a round disc (my ramekins required a medium biscuit cutter).

Fill your ramekin to the top with the chicken mixture. If you want to add additional protein, you'd add 1/2 a scoop of unflavored protein powder directly into the ramekin with the chicken mixture and stir well.

Using your finger, put a layer of water around the rim of the ramekin and then top with the disc of dough. There should be a slight overhang. Pinch down the sides and then cut a small slit in the top for ventilation.


Bake at 400 degrees for about 10-15 minutes or until crust is golden brown. If you use the cheese keep an especially good eye on the crust as the cheese will brown quickly.

The ramekins you see are actually 2 oz. ramekinsI got at the dollar store. I used these to show newbies that YES you too can have pot pie! For further-outs, you might want to use a four ounce ramekin, which is how I eat these with a little side salad.


Enjoy!

Jen's "Buffalo Wing" Cheese Ball

~~posted by Jen


Dig in!
Earlier this week Nik shared her scrumptious Buffalo Chicken Salad. I too, am a hardcore devotee of Shari's original Buffalo Chicken dip. That stuff definitely helped me get real food in when I was early out.

My ex-husband Ken LOVES LOVES LOVES buffalo wings. I am not kidding. So I created this dish for him to snack on when watching football, and he says it's "the bomb." That was one of his Christmas gifts from me, along with his DVD Snack Basket. I'm not even a big fan of actual buffalo wings, but I love this cheeseball.


Jen's Buffalo Wing Cheeseball
(makes 2 cheese balls or logs, whichever shape you prefer)
Ingredients:


For the cheese ball:

16 oz. Neufchatel cheese (1/3 less fat cream cheese), softened

1/4 cup Greek Yogurt
2 stalks celery diced fine, I chopped mine in my Ninja (note: Celery is optional, and only recommended if you are a year out or more. Celery is very stringy and can bother newer pouches! Some plans even prohibit it for life so check yours before using it. You can substitute celery salt or dried celery leaves for the same flavor profile.)
1 can chicken breast meat, drained and shredded fine with a fork
1 package bleu cheese crumbles
1/2 packet Ranch dip mix (I used Hidden Valley)
2 tsp Hot Sauce (I used Frank's Hot Sauce, or Tabasco would work. I don't like spicy, if you do, feel free to add more.)

For the coating:
1c. slivered almonds
2 tbsp Ranch dip mix

Directions:

In a bowl, combine cheese and yogurt and beat with a hand mixer until just blended. Add protein powder and dip mix powder and beat again until fully incorporated. 
Stir in the chicken, bleu cheese crumbles, and celery until well mixed. 


Lay out a large piece of waxed paper and, using a wooden spoon or rubber spatula, scrape half of cheese 
mixture onto it. Roll it into a log (or ball, your choice) and wrap tightly with plastic wrap. Repeat the process with remaining half of the mixture. Refrigerate at least 2 hours.
Nuts and Dip Mix waiting for the cheese to drop!

In a rectangular bowl or plate, combine the coating ingredients until mixed well. Drop the first cheese log/ball into the coating mix and roll it around until all sides are completely covered. Repeat with the second log. If you're planning to serve right away, transfer to your serving platter. Otherwise wrap tightly with plastic wrap and store in the fridge. They're good for up to a week as long as kept refrigerated. 
The completed cheese log 

I serve this with Wheat Thins or those new Flatbread Thins Olive Oil and Sea Salt crackers. You could use pita chips or veggie dippers as well.
YUM!


Of course, I blame Nikki for my newfound love of cheeseballs. It all started with the curry. So this combines my love of the flavors associated with buffalo wings and the snackability of a cheese ball. THIS is what we mean when we say Play With Your Food™!

Think of a flavor combination that you enjoy, and remix it with healthier, more WLS-friendly ingredients. Snap a pic and send us your creations! Rock on, Pouch Party™ Nation!


Sunday Supper: Crockpot Vegetarian Bean Soup

~posted by Jen
Ready to devour!


I'm still battling this cold/flu/bronchitis crap that won't go away, but I also have a family to feed. Today I made it easy on myself by popping dinner in the Crock Pot while I was making my morning Clickety Split Vanilla Toffee Salted Cocoa. It will be done tonight when the boys are hungry, and I didn't even break a sweat.

You've all heard me mention the resident vegetarian (RV), so I made this soup meatless. You can certainly toss in a ham bone (freeze it after your Holiday Ham Dinner) or whatever meat you like. Boneless pork chops are delicious when cubed into pieces and cooked in this, or even bacon. Play with your food, people!

Jen's Vegetarian Bean Soup


Ingredients:
1 (16 ounce) bag 15 bean soup mix
1 medium sweet onion, chopped into small pieces
1 (28 ounce) can petite diced tomatoes with the juice
3 cups vegetable stock (I used homemade, but you can use stock in a box)
1 cup water
1 package Goya Sazon
2 tbsp Garlic Powder
2 tbsp Salt
2 tbsp Onion Powder

Directions:
Rinse the beans in a colander and "look" them (sort through them and make sure there are no small pebbles or debris, if so remove it). Add all ingredients to the Crockpot and cook on low for 8 to 10 hours. If you need it faster, cook on high for 4 to 6 hours.

Just before adding the liquids


Stir the soup about halfway through cooking, and taste the broth for seasoning. You may need to add more salt or garlic powder, based on how salty your vegetable stock was.
Halfway done, time to stir and adjust seasoning

I'll serve mine with a dollop of Greek Yogurt stirred in and some shredded cheddar cheese. NOM! The boys wanted rice to eat with theirs, so I will cook some in the rice cooker for them.
Cooled and ready for the fridge.

It gets better as it sits in the refrigerator, so I plan on having this for lunches during the week.
Related Posts Plugin for WordPress, Blogger...