Your Quest Bar orders help create more giveaways. Order today!

NEW! Working Search Button! USE IT!!!

Love BF as a blog? You'll love it even more as an e-mail newsletter. Get recipes, tips and more!

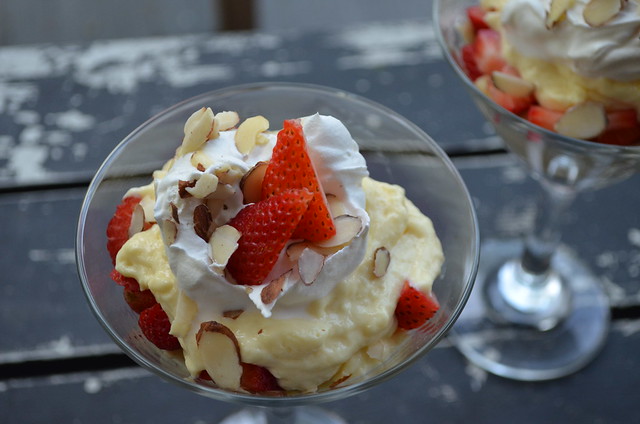
Strawberry Cheesecake Pudding Parfait (featuring Premier Protein)

Strawberry Cheesecake Parfait

Long-time readers...I know what you're going to say, ok? I KNOW. Yes this is the gamillionty-seventh cheesecake-inspired recipe on this blog.

But Google Analytics says 90+% of you reading this have never been to this blog before so...hi. I'm Nikki. And I like cheesecake!

But as we all know cheesecake can be fatty and sugary and all sorts of things that can cause certain gut-death. I won't lie. At 7 years post-op I do enjoy a bite or two of the real thing every now and again. 

And on regular days I have this.

Nik's Strawberry Cheesecake Pudding Parfait
(Makes 5-ish servings)

Ingredients:
  • 1 box sugar-free instant cheesecake flavored pudding mix
  • 1 container (11 oz.) Premier Protein shake (Strawberry or Vanilla works best, in my opinion)
  • 6 oz. container plain Greek yogurt (Note: Do use plain, it cuts the sweetness of the pudding mix and the protein shake combined!)
  • 1 oz. reduced fat cream cheese, softened (it amps up the cheesecake factor…)
  • ¼ tsp. lemon juice
  • About 10 strawberries (or 2 per parfait), hulled and sliced
  • Whipped cream
  • Optional (pictured): sliced almonds
Directions:
  1. Place the instant pudding mix and protein shake in a mixing bowl and mix on medium speed about 2 minutes. (You want to work out any powder lumps.)
  2. Add the Greek yogurt, cream cheese and lemon juice and mix again, until combined. Refrigerate at least two hours.
  3. To assemble: place a few sliced strawberries at the bottom of a cup or bowl. Top with ¼ c. pudding mixture, then a dab of whipped cream. Repeat.
If you like a little crunch, you can use high-protein granola in there too. These days I like to crush a bit of Fiber One and add it as a layer.

I originally published this recipe on ObesityHelp.com and I did something unprecedented. I posted nutrition facts! (Dear folks new to Bariatric Foodie. I do not generally post nutrition facts for my recipes. Here's why.) But I'm going to make you head over there to get that information. It's a great site if you've not been there before...plus I can't be starting habits over here at Bariatric Foodie.

One habit I will keep, though, is posting outtake pics! Here you go:


Strawberry Cheesecake Parfait
There isn't a particular reason I didn't use this one at the top. I just didn't.


Strawberry Cheesecake Parfait
I usually use a slatted bench on my front porch to take photos (my porch is the only place in the ENTIRE house that gets good light!). But every once in a while I mix it up. This is actually my porch floor. I didn't like the pic because the right glass seemed skewed. #PerfectionistProblems

Strawberry Cheesecake Parfait
As I've said many times...direct overhead shots are my "comfort zone." I'm trying to get out of my comfort zone. Plus...it's a parfait. You gotta see the layers!

#PWMF Recipe Contest Dessert Winner: Sue's Pumpkin Cheesecake


Y’all thought I forgot about the rest of the “Play With My Food” recipe contest winners, didn’t you?
NOPE! We’ve got two more Foodies to feature.
First up, Sue! She submitted a yummy WLS-friendly dessert recipe that judge Denise thought was out of sight!
Sue’s Pumpkin Cheesecake
 Here is Sue's entry photo:

Ingredients:
  • 1 -8oz pkg Greek Cream Cheese, softened
  • 1 scoop vanilla or unflavored protein powder
  • 2 eggs
  • 1 tsp. vanilla extract
  • 1/4c. + 2Tbs Truvia baking blend
  • 1 small can packed pumpkin
  • 1 1/2 tsp. pumpkin pie spice
Directions:

In a bowl beat cream cheese until smooth and add in protein powder, vanilla and 1/2 of the Truvia. 

Mix well.  Add eggs one at a time and mix well after each one. 

Add pumpkin, remaining Truvia and spice.  Mix well.

Pour into a sprayed glass pie plate.  Bake at 350 degrees for 1 hour. 

Nik Notes:
 I have extensive cheesecake experience so you KNOW I have to put in my three cents!
  • Those of you who have followed my blog for a while know of my quest for a cheesecake free of cracks! For some of you, cracks are no problem so long as it's yummy! And sometimes (especially if you're having guests) presentation is more important. If you’d like to lessen the likelihood of cracks, it’s a simple thing to do. Just put an oven-safe pot of HOT water into the oven when you put your cheesecake mixture in there. The cheesecake doesn’t need to sit IN the water, you can put the water on the same or another rack. The steam helps it cook gently.
  • I also have always cooked cheesecakes at 325 for 35 minutes, turned the oven off, and left it open a crack to finish cooking as the oven cools down. Why? Because Alton Brown told me to!
  • Lastly, if you have a springform pan those make cheesecake extraction a snap! Just make sure to line the bottom with parchment paper so you can easily get it off the pan.
Here’s what Denise said about Sue’s cheesecake!

"The texture was moist and smooth. Flavor was good. Kid liked it. Passed all tests. Lol. Not as dense as classic cheesecake, but I didn't expect it to be. Easy, protein enhanced, and yummy."

The very first picture in this post is a slice of the cheesecake Denise made according to Sue's recipe. Here's a picture of the entire cheesecake:


Crustless Pumpkin Cheesecake (with Sugar-free Salted Caramel Pecantopping)


I know, ok? I know. I posted this recipe on Facebook like a week ago and folks have been patiently waiting for me to post the recipe.

As it usually happens, by the time I get around to figuring out a share-able recipe, very few people care anymore! But for accountability's sake, here we go.

This recipe was a bit tricky because it came about by accident. I was making a sugar-free pumpkin pie and I made the mistake of using the recipe on the can of pumpkin which yielded WAY too much pie filling for one pie shell. Not wanting to throw the rest of the filling away, I played with my food and came up with a very yummy (but small and thin) crustless cheesecake. Here it is:


But those who have made cheesecake before know the methodology is a bit different from a pumpkin pie and so I wasn't sure how this recipe went without me having first mixed up too much pie filling! That was my objective: to find out.

And I have!

I made a few noticeable changes to this recipe in its final format. Firstly, it's a full-size cheesecake. Secondly, as such I baked it in a springform pan. You can still use a baking pan if you want, just make sure to refrigerate it a few hours before cutting it and use a pie knife to lift the pieces if you go completely crustless. OR you can try one of these delicious nut crusts I keep hearing about. If you have a good recipe, post it in the comments so your fellow Foodies can share in the love!

Nik's Crustless Pumpkin Cheesecake

Ingredients:
  • 16 oz. low-fat cream cheese (NOT fat-free), softened
  • 6 oz. unflavored Greek yogurt (yes you still need this even if you use the cream cheese made with Greek yogurt)
  • 1 (15 oz.) can of pumpkin puree (NOT pie filling!)
  • 1/2 - 3/4 c. Splenda (or your favorite sweetener's equivalent of 3/4 c. sugar) NOTE: If everything tastes too sweet to you, go with the lower amount. If you are serving this to a lot of non-ops go with the higher amount!
  • 1 tsp pumpkin pie spice
  • 1 tsp. pure vanilla extract
  • 3 egg whites
  • Optional: 2 servings (whatever that is on the canister) of either vanilla or unflavored protein
Directions:

Arrange your oven racks so there is a rack at the bottom and one in the middle. Pre-heat your oven to 325 degrees and put a large pot or full kettle of water on to boil.


In a large mixing bowl, combine cream cheese and Greek yogurt. Beat on medium with a hand mixer until they are thoroughly combined.

Add in pumpkin, sweetener, protein (if using), pie spice and vanilla and blend again until thoroughly combined.

In a separate bowl, beat your egg whites until they form soft peaks (about 3-4 minutes on medium).

GENTLY, tip your egg whites into the cream cheese mixture and use a scraper or a long wooden spoon to gently fold the egg whites into the mixture (folding is gently turning the batter over on itself over and over again). NOTE: It may take a few minutes to get it all combined. Do not rush and do not use the hand mixer!


If you're using a baking pan, spray it down with non-stick cooking spray. If you're using a springform pan, line the bottom with parchment paper (you can also just spray it down, but parchment paper makes it easier to remove the cake from the pan later). Scrape the batter out of the bowl and then spread it evenly.


In the bottom rack of your oven, set a large baking dish and then fill it with the boiling water. In the center oven rack, set your baking dish.

Bake for about 35 minutes or until the cheesecake seems mostly set (it will start to pull away from the sides of the baking dish and will appear firm). Turn off the oven, prop the oven door open and allow the cheesecake to stay in there while the oven cools down, usually about 20 - 25 minutes. This is what it looks like at the point when you turn off the oven. As you can see it retains the little swirls from me spreading it in the pan. If you are a perfectionist...well...make sure you spread the top flat! You'll notice some cracking. That happens. I am not a master baker so my cheesecakes almost always crack a little. Usually small cracks are a good indication it's time for the oven to go off.


When the oven is cooled remove the cheesecake to a cooling rack and cool thoroughly before covering and refrigerating. I get the best results when I refrigerate overnight, but I think 2-3 hours would do the trick.

If you used a springform pan, run a sharp knife around the perimenter of the cheesecake before releasing the springform.

UPDATE:

So here's what had happened. After I shut down the computer and was all set to lie down while the cheesecake cooled down I realized it wasn't as set as I thought so I turned the oven back to let it cook a few more minutes...then promptly fell asleep!

Thankfully my little nap only lasted 20 minutes (I had intended to only let the cake go about 7 more minutes) but it was just enough time to...produce really HUGE cracks!


So how did I get to the thing of beauty at the beginning of this post? Well my motto is, "If life gives you a cracked cheesecake, make a topping!" For this one the topping is super-simple, with only four ingredients!

Nik's Sugar-Free Salted Caramel Pecan Topping

Before I give you this recipe I need to stress this is holiday or party food. Unless you have big family dinners regularly or just have a gargantuan sized family, don't be making this all the time, k?

Ingredients:
  • 2 c. chopped pecans
  • 2 tbsp. butter (or whatever you use in place of butter)
  • 1/2 c. Smucker's sugar-free caramel sauce
  • 1/4 tsp. coarse sea salt
Directions:

Set a pan over medium flame with no non-stick, no nothing and let it get HOT!

Add the pecans and toast them, stirring often, until you can just begin to smell them. Transfer to a bowl.

In that same pan, melt your butter. Add your caramel sauce. Almost instantly the caramel sauce is going to change from a lighter tan to a darker brown. That is good and right and normal.

Add the salt and stir until it begins to boil and bubble. Make sure the sauce, butter and salt are all mixed together before pouring into your bowl of pecans. Then stir the mixture thoroughly. Here's my batch.


Allow the mixture to cool for about 3 minutes (you want it cooler but not completely cooled) before setting it atop your cheesecake. From there I DARE anyone to notice the cracks!

Savory Cheesecake with Sausage & Crab Topping featuring LaughingCowQueso Fresco Chipotle


Like I’ve said many times on this blog, I draw inspiration from many places. The neat thing is that my brain retains stuff a LONG time.


The inspiration for this recipe was an episode of Diner’s, Drive-Ins and Dives, which I tend to watch while on the elliptical machine (not to be confused with 30-Minute Meals, which I watch on the treadmill or Jersey Shore, which I watch on the recumbent bike).

Guy Fieri was in Florida at a place where a man made a savory cheesecake topped with a Sausage & Gator sauce. I loved the idea of the savory cheesecake. Being a Mid-Atlantic girl, I did not love the gator part. (SIDE NOTE: To be fair, I wonder if Gator meat is to Florida as crab meat is to Maryland?)

So that was my suggestion for this shindig. Now I did something I rarely do at this party. I went in with a “blind recipe.” This means I had the recipe all worked out in my head but I’d never made it before, had no idea if it really tasted good. I usually never do this. And the failed pork slider is a good example of why! I like to think I’m as humble as the next guy but my ego suffers when people don’t like my food!

Thankfully, this got thumbs up from all the party-goers. I have Margaret to thank for the topper. We used leftovers from her Roulade salsa and it was MARVELOUS! The cheesecake made it feel like comfort food. I wasn’t sure if I’d like a savory cheesecake but now I can say with assurance I do! And this one is good because it’s made in a mini-springform pan! So for most of us, this is no more than three servings.

Savory Cheesecake with Sausage & Crab Topping
(Makes two mini-cheesecakes)

Ingredients for the Cheesecake:
  • 1/3 c. cottage cheese, blended to smooth out the lumps
  • ¼ c. ricotta cheese
  • 4 triangles Laughing Cow Queso Fresco Chipotle cheese
  • 1 small jalapeno pepper, de-seeded and chopped fine
  • 2 tbsp finely diced onion
  • 1 egg (or ¼ c. Egg Beaters)
  • For the crust: 1/3 c. whatever high fiber cereal you like, crushed (we used Shredded Wheat) + 1 tbsp butter
Ingredients for the Topping: (this is my intended sauce not Margaret's sauce - we went where the mood took us - but when she sends along her recipe, I will post it!)

Ingredients
  • 1 tbsp. extra-virgin olive oil (or non-stick cooking spray)
  • 1 log Andouille sausage, cut into half-rounds 
  • 1 small zucchini, diced
  • 1 small onion, diced
  • 1 clove garlic, minced
  • 1 tomato, diced
  • 1 jalapeno pepper, seeded and finely diced (skip if you don't like any heat)
  • 1/2 c. real or imitation crab meat
  • 1/2 c. of water OR white wine (your body, your choice)
  • 1 tsp. Herbs de Provence (or your favorite fresh or dried herb blend)
  • 1 tbsp. tomato paste (which Margaret says is unnecessary for most sauces but I like to thicken it up a bit!) 

Directions:

Preheat your oven to 350 degrees.

In a bowl (or a zip-top bag as we discovered), combine cereal crumbs with butter until well mixed. Press mixture into the bottom of a mini-spring form pan and bake for 10 minutes.


In a bowl, combine cottage cheese, ricotta and Laughing Cow wedges. Stir until thoroughly combined. Add jalapeno and onions and mix again. Add egg and mix again until thoroughly combined.

Pour half of mixture onto the crust in the mini-spring formpan. Refrigerate the rest until you want to make it (it’ll keep about 3 days in the refrigerator).

Place the mini-spring form pan in a small baking dish and surround it with hot water.

Put the baking dish in the oven and bake for about 30 minutes or until it is set (it should develop a “crust” on top and be semi-firm to the touch). Turn off the oven but keep the cheesecake in the oven until the oven is cooled (about another 15-ish minutes).

Meanwhile, to make the sauce, heat your oil in a pan and add your sausage. Cook until they have a slight crisp on them. Add all veggies except garlic, jalapeno and tomato and saute about 3 minutes or until tender. Add garlic, jalapeno and tomato and crab meat and drop your heat down to medium. Allow it to simmer for about 10 minutes (the tomatoes will release a good deal of liquid but don't worry if you get some pan crud). If you do get pan crud after the 10 minutes, lift it with the water or the wine by pouring it in the pan and gently scraping it off the pan with a wooden spoon. Add tomato paste and herbs and stir in completely and allow it to simmer about 5-7 minutes more. 

When the cheesecake is done run a knife along the perimeter of the pan before releasing the spring form and lifting the ring. Then, using a butter knife, gently slide the cheesecake off the bottom of the pan and onto a plate.


Top the cheesecake with the crab and sausage mixture and serve!

A cheesecake...for lovers

Boy, oh boy, a lot of my microwave made it into this picture, didn't it?

...Or two (maybe three) people who really, really, REALLY like cheesecake.

While in Michigan, I happened upon a 4 inch springform pan. My plan was to make a cheesecake in my Magic Bullet to submit for the Kitchen Magician contest. By the way, THANK YOU to everyone who voted for me. Sadly, I was not a finalist. But I think it's because they let folks get votes before the submission period ended so those of us who were late to the game didn't stand much of a chance :(

I don't want to be a sourpuss though. I'm going to focus on 500+ people who DID vote for me. I appreciate you all!

So those of you who have been reading this blog a while know there is no shortage of cheesecake recipes up in here. We've got cheesecake protein shakes, portion controlled cheesecakes, full-sized protein cheesecakes, cheesecake trifles...even a damn protein cheesecake cheeseball. Basically far more cheesecake stuff than should ever be on a blog for people trying to lose weight (but...to my credit the cakes are low-fat, low-carb and most have good protein stats).

I figure...why not throw this little gem into the ring with the rest?

Nik's "Two's company, three's a crowd" Mini-Cheesecake

Ingredients:

1 c. Fiber One Original cereal, crushed (I used my Magic Bullet)
3 tbsp low-fat cream cheese
2 tbsp Splenda
1 tbsp Davinci sugar-free vanilla syrup

Filling

4 oz. low-fat cream cheese
2 oz. unflavored Greek yogurt (I used 0%)
1/4 c. liquid egg substitute (or one egg)
1/3 c. cocoa powder
1/2 c. no-calorie sweetener (start with 1/2 c. and then taste the mixture. If the sweetness hasn't overtaken the cocoa, add more by the tablespoon-full until you get there)
Optional: 2 scoops unflavored protein powder (I did not use this time)

Directions:

To prepare the crust, mix the cereal crumbs with the cream cheese and syrup until it resembles brown sugar crumbs.

Press into the mini-springform pan (this makes enough to make a bottom and side crust) and bake at 350 for 10 minutes (I used my toaster oven).

In a large bowl, combine the cream, Greek yogurt, eggs, cocoa, sweetener and lemon juice. Beat on low with a hand mixer for two minutes, then switch to medium speed for another minute or two.

Spoon into cooled crust.

Wrap the bottom of the springform pan in aluminum foil then place in a small baking pan (I used a 13x9) and fill the pan up with boiling water halfway up the side of the springform pan.

Bake at 350 about 25 minutes or until set (again, I used my toaster oven).

Cool completely before removing from the springform pan.

Like I said, this is the perfect cheesecake for sharing with one or two other people. The beauty of it is, you don't even really have to cut it. Just pass out the forks and go to town...

Protein Cheesecake Egg Pops


Note to self: Never, ever, EVER do multiple dessert offerings during a week when the kids aren't home.

Moving along...

Of all the offerings so far - the protein carrot cupcakes w/ protein cream cheese frosting, the Cadbury Cream Egg protein dessert...this one was the MOST fun to make.

As I was making it, I thought about how much the divas would probably enjoy this. Outside of Easter, you can certainly make round shaped pops. This seems to me a wonderful way to keep kids occupied on a rainy day.

Nik's Protein Cheesecake Egg Pops
(makes 8-12 depending on the size of your pops)

Ingredients

One of Nik's Protein cheesecakes
Popsicle Sticks
A mini-scoop (or two large spoons)

Toppings used above:

Sugar-free chocolate, melted
Sugar-free almond granola (from Whole Foods)
Sugar-free ice cream sprinkles
(for the kids) Colored sugar

Directions:
A note about the cheesecake. It's ridiculously easy to make. Especially for this recipe because, unlike a cheesecake you intend to use as a cheesecake you a) don't have to use a springform pan and b) who the hell cares if it cracks. Also ditch the crust in the above recipe. You don't need it!


When the cheesecake is all cooked and cooled you'll want to scoop out hunks of it. TIP: wet your hands and then spray them down in non-stick (yes both). It makes egg forming a LOT easier. Here's what they look like pre-decorated.


Now don't worry if the surface of your eggs isn't perfect. You can go back and fix that (we'll get to that in a moment). For right now, though, get your popsicle sticks. Dip about 1/4" of them in either your melted chocolate, some sugar free cake icing or even some left over cream cheese. Then insert into the egg. Why? When it freezes it'll hold the heavy egg on the popsicle stick!

Then, lay them on a wax-paper lined plate and pop those babies in the freezer for about 15 minutes. Whilst they are chilling, let's contemplate toppings, shall we? The sky really is the limit but in the interest of not going TOO crazy...keep it reasonable. The sprinkled one is for La Grande Diva. Even though it is sugar-free sprinkles, I'm just not a sprinkles kinda gal. The sugared egg is for La Petite Diva. She loves pink. Now that chocolate one with the granola? That one is for me!


Anyway, set out a dipping station and let the kids choose the toppings they like.

Take the pops out of the freezer and allow the kids to dip them. If they fall off the stick, re-dip the stick in chocolate or icing and re-insert and re-freeze. Unless you have a bunch of kids doing this, take out a few at a time from the freezer so they get really cold.


If you're not eating them right away, put them back in the freezer until you are ready to eat them.


These are a really cute conversation piece when you're having folks over. I didn't have time to do the presentation piece the way I wanted but the above is just a simple $1 glass filled with Easter Candy with the pops in it. Again, use your imagination!

Some tips/warnings:

#1 - Your hands will get dirty!!! (And your clothes, and your kitchen, and your floor...)


#2 - Smoothing out the egg


Once they are firmed up a bit in the freezer, dip your fingers in water and smooth out the surface of the egg. Remember to put it back into the freezer for a few minutes to firm back up aftward. This is all a moot point, however, if you plan to coat the entire egg.

#3 - These WILL go fast! Get yours and then get the heck outta dodge!!!


NOM!!!!


That's it for me and Easter treats. I feel the urge to hurl myself at a pile of veggies now, if you'll excuse me...

HAPPY EASTER!!!

Nik's Protein Cheesecake Cheeseball

~by Nikki


First, forgive me for my lack of process pictures. In general I’ve been working on snapping pictures as I go along making a dish, but this one didn’t get “the treatment.” Why? Well, because I didn’t originally plan to post this!

Long story short…remember how I said I went to my annual bariatric reunion on Sunday? Well my surgeon’s office has been a BIG support to Pouch Party™ and, in fact, has a party scheduled for early January as a part of its “Back on Track” month. At the reunion, a staff member from my surgeon’s office reminded me that yesterday was support group and that it’d be a GREAT time to hand out fliers for the next party. (Cue panic on my part as I’d not yet made any fliers for the party!) Then a fellow post-op who heard about Bariatric Foodie asked, “will you be bringing something yummy to group?”

Initially I answered no but my brain chews on stuff like that. I wanted to bring a sample of something, as I always do when I announce a party at a support group, but I simply didn’t have time to make anything complicated. The theme of the support group that night was holiday eating. So I thought, and I thought and I thought…then my head hurt. Then I thought some more and this recipe came to mind!

I’ve made it a few times and it scored well with the family and is so quick and easy to make. For those of us who, after surgery, want to avoid big indulgent desserts, it’s a neat way to get your cheesecake fix in. And NOBODY can ever tell there’s added protein unless I tell them.

Nik’s Protein Cheesecake Cheese Ball

Cheese Ball Ingredients:

12 oz. Neufchatel cheese (1/3 less fat cream cheese)
1/3 c. 0% unflavored Greek yogurt
2 scoops Any Whey unflavored protein powder
1 c. no-calorie sweetener (I used Splenda)
2 tsp. lemon juice

Coating Ingredients:

1 c. Whole Grain Cheerios
2 tbsp no-calorie sweetener
3 pumps SF Davinci Caramel Syrup

Directions:

In a bowl, combine cheese and yogurt and beat with a hand mixer until just blended.

Add protein powder, Splenda and lemon juice and beat again until fully incorporated.

Lay out a large piece of plastic wrap and, using a wooden spoon, scrape cheese mixture onto it.

Wrap it and form it into a ball. Refrigerate 2 hours.

In a mini-chopper or food processor, combine all coating ingredients and pulse until a moist crumb forms.

Once the ball is firm, lay out coating on a plate and drop the ball onto it. Roll until completely coated.

Transfer to a plate and serve with reduced fat graham cracker pieces or fruit.

At support group I served this with half-slices of Macintosh apples. I think that was a good choice. Macintosh apples are fairly starchy but sweeter than a red delicious. One of my group members suggested a Granny Smith. That could work too, although the tartness of the lemon juice in the cheese ball and the tartness of that apple might not play nicely together. But you know what we always say…play with your food!

This is a great thing to bring to your office holiday party as a safe and tasty dish. Stay tuned later this week for the official "BF Survival Guide for Holiday Office Parties" for even more strategies to get through the party season!

To my support group peeps…thanks for giving this recipe a try! From what I could tell it was two thumbs up! I mean…when I walked into the room, I had a cheese ball. When I left the room, I had no cheese ball. So…yeah. I think it was good!


Enjoy.


Banana Protein Cheesecake


Ok, first of all...how come everytime I'm about to post something really good my camera starts to act stupid? Let's discuss THAT. (or not)
Protein cheesecake...YAY!!!

There is one benefit to my being so late with this. I ended up having to make another one (the sacrifices I make for youse guys!!!) and this time tried one with a hint of banana. OMG...serious yumminess going on here.

So here's the set up:


Crust

2 cups Fiber One Original cereal (the twiggy kind)

2 tbsp light butter spread (I use Blue Bonnet Light)

2 tbsp Splenda


Directions for the crust:


Using a food processor, grind together cereal, butter spread, and Splenda until a course meal forms.

Press into a springform pan (or if making cheesecake squares, into a foil lined and sprayed 9x13 baking pan)

Bake at 350 for 10 minutes and allow to cool

Cheesecake Ingredients

Two 8 oz. packages of Neufchatel cheese (1/3 less fat cheese)

1 cup 0% unflavored greek yogurt

2 eggs

either 2 tsp of lemon zest OR 2 packets of True Lemon

3 scoops of your favorite vanilla protein powder (make sure the calorie range is somewhere around 100-120 calories but no higher)

1/2 c. milk

1 c. Splenda

For the banana hint:

1/2 package of fat-free, sugar-free banana cream pudding mix

Garnish shown above:

3 slices of banana
1/2 tablespoon sugar free caramel sauce

Directions:

In a bowl or cup, mix protein powder and milk until a smooth paste forms

In a mixing bowl combine cream cheese, Greek yogurt, and protein mixture and beat on low until incorporated (it may be lumpy...hell it will probably be lumpy...don't worry...it'll be fine)

Add lemon (or True Lemon), Splenda, and eggs and beat again on medium until everything is incorporated. Again, it will probably be fairly lumpy unless you're using protein that has been formulated for baking. Again, do not freak out. It's okay!!!

Pour mixture over cooled crust and spread to make an even layer.

NOW...if you are making in a baking pan you'd pop it in the oven and bake for 35 minutes

HOWEVER

If you are doing this in a spring form pan you do the following:

1. Line the bottom of the pan with aluminum foil

2. Set the pan in a larger pan (like a roasting pan)

3. Fill the roasting pan with warm water until it goes halfway up the springform pan

4. THEN put it in the oven

Keep an eye on it...especially if you are one of those perfectionists that doesn't like cracks in their cheesecake. Personally? So long as it tastes good I'm good to go.

Once the 35 minutes is up, prop the oven door open and keep the cake in there until the oven cools. Then transfer to a cooling rack to cool another 20 minutes before refrigerating for about 3 hours (this is NOT a quickie treat).

It is...quite simply...lovely...

My next endeavor is to incorporate soft tofu in here somehow and remove some of the cream cheese. Stay tuned for that. Until then...enjoy!

NOTE: These slices are way bigger than I eat. I usually cut mine into 1/16th of the whole cake (these are cut into 1/8ths for the divas consumption). If you make squares they make about 24 good sized squares but as always it's flexible. Cut them as big or small as you like!

Stats: for the basic cheesecake recipe (not including the banana pudding...cuz I was just too lazy to do it up...later...maybe...)

For a round cake cut into 16 pieces: 126.25 calories, 11g carbs, 3.6g fiber, 8g protein

For 24 squares: 84 calories, 7.3g carbs, 2.4g fiber, 5.3g protein

*Note: if you use different ingredients than me, you may end up with different stats, always double check through your own food journal program.

Any way you slice it...much better stats than traditional cheesecake!
Related Posts Plugin for WordPress, Blogger...